MAMiller44
Full Access Member
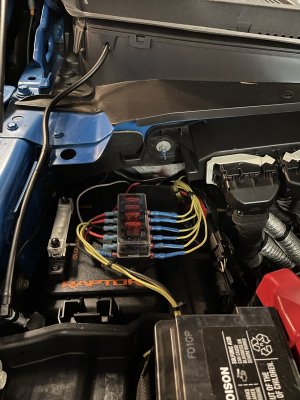
As many of requested, here is a write-up of my aux/upfitter wiring fuse block. Now before we start, I have to give kudos to @Swimmer for a lot of the initial inspiration for this setup.
Why would you want to do this setup?
Materials List - The titles of each item are linked to Amazon
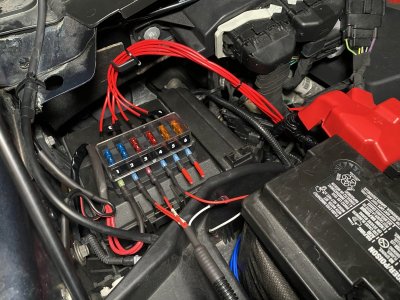
Fuse Block: There is a 6 fuse option which is the only thing that will fit 2019-2020 fuse boxes like what I have. 2017-2018 fuse boxes are flat and you could fit a 12 fuse block spun 90 degrees from the above picture if you'd like. The 12 fuse block would allow you to keep all of the pass-thru wires plugged in. I would have gone this route if I had a 2017 or 2018.
ATO Fuses for Block: Could easily get at any auto parts store too.
16AWG Wiring: Aux 1 and 2 are 16AWG and 3 thru 6 are smaller, however there is no harm in just staying consistent with 16AWG for all of them. With wire sizes, bigger is okay. Smaller is no bueno.
Heat Shrink Connectors: This kit includes a number of different connectors that you can use for grounds. I personally don't like to use the heat shrink spade connectors because they warp, but you can if you'd like. If you don't want to solder, this kit also comes with the heat shrink connectors. You definitely want to
Spade Connectors: I use these for all the connections to the fuse block. Now you don't have to use spade connectors but they will work with the linked above fuse block and this is the standard connection for Bosch relays if you plan to utilize any relays in the future.
Heat Shrink Tubing: I actually only like to get the Commercial Electric stuff from Home Depot. A lot of the tubing you can find online from places like Amazon stays a little sticky. The Commercial Electric seems to stay less sticky after shrinking.
Now you'll also need some standard tools such as a heat gun for the heat shrink, solder gun if you intend to solder like I did, wire stripper, crimper, multimeter, zip ties for organizing, and a label maker if you'd like to label your stuff. I have a Brothers P-Touch to label everything.
Step 1: Read Your ******* Manual
I know this is going to hurt a lot of your pride, but you need to. Specifically the Raptor supplement. In here you will find the guide for your aux wiring. The problem is that Ford changed the wire color pretty much every year, and they didn't make it any easier by occasionally using some of the same wiring colors in different spots. So, get this info and keep it handy.
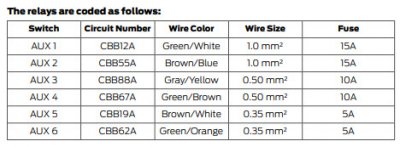
Step 2: Find AND TEST the Wires
There are two bundles of wires with the same coloring that you'll find tucked between the battery and firewall. One of these bundles has all the 12v + wiring that feeds off the aux switches. The other bundle is a set f pass-thru wires that you can access the other end of behind the passenger fuse box inside the cab. There are multiple reports of these bundles being "flipped" so do yourself a favor and check which ones are actually hot when the aux switches are flipped on.
Step 3: Prep Your Extension Wires
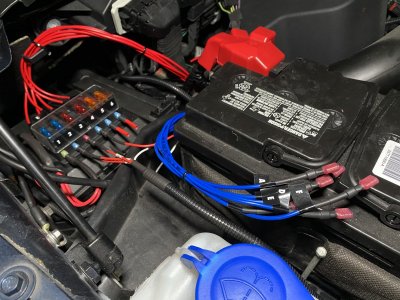
I did 18" wires which is more than enough to have plenty of slack to move around that area, and also to pull off the factory fuse box cover if you need to without unplugging all your aux stuff. So, I cut six (6) red wires for the hot wires from the aux switches and six (6) blue wires for the pass-thru wires to the passenger fuse box. in the house I crimped on the spade connectors (female end), heat shrunk around those, and added my labels so I could knock all that out in a controlled environment. Once that was all done I stripped the other end of those wires and pre slipped on the heat shrink tubing for that connection. Always slip on your heat shrink as soon as you're ready!! Nothing is worse than when you finish connecting some wiring, grab your heat gun, and realize you never slipped it on.
Step 4: Solder (or Crimp) Your Extended Wires On
This is the part that really sucks. The factory wires are short and you're going to be awkwardly laying across your engine bay trying to get this done. But again, with this setup this is the ONLY time you'll ever have to do this. Now, I soldered on my extended wires and heat shrunk over those solders because this is the most secure way you can splice wires together. If you are not comfortable with soldering, especially in an awkward spot like this, then I would recommend using heat shrink butt splices. Some of these are included in that kit in the parts list above. Full disclaimer, if you are using butt splices, USE THE HEAT SHRINK ONES. These will give you the next best hold in case a wire ever gets tugged next to soldering.
Step 5: Plug It All In
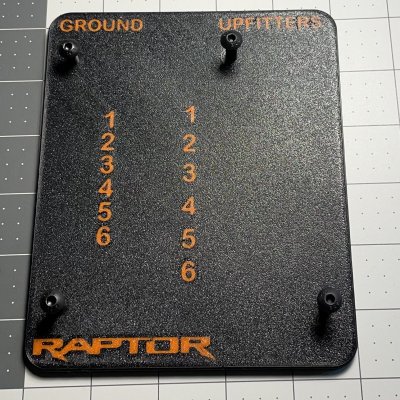
Guys that's pretty much it, this is really simple. At this point. Attach your fuse block to your factory fuse box cover (I bolted through the cover but you could use adhesive or velcro too). And this is the best part of this setup, now everything just simply plugs in. Congrats!
Step 6: Cap Any Unused Hot Wires
Even if they are switched, make sure you cap any unused hot wires in your system. The pass-thru wires are fine because they aren't hooked up. You can see in the pictures where I put a little spade connector with electrical tape in the fuse block for switches 5 and 6. Safety First.
Optional Step 7: Prep Your Pass Thru Wires
I went into the panel where the passenger fuse box is, where the other end of the pass-thru wires are, and added quick connectors + labels on those.


Why would you want to do this setup?
- You'll have extended wires from the factory aux wiring. Factory ones are short, they suck. So if you do this now, it's the only time you'll ever have to struggle with those short wires.
- You'll have spade connectors on everything, including your pass-thru wires. These are great because you can change what aux switches are used for what as your mods progress, and the spade connectors are standard for Bosch Relays if you ever want to implement relays into your system.
- You have an additional spot for fuses! Your aux switches are already fused but there's no harm adding another to the circuit. If you ever need to directly power something off the battery though you can make a little 1' jumper cable and use the fuse block rather than having an inline fuse somewhere.
- This still provides full access to the fuse box below.
- It looks clean as **** when you show off your engine bay.
Materials List - The titles of each item are linked to Amazon
Fuse Block: There is a 6 fuse option which is the only thing that will fit 2019-2020 fuse boxes like what I have. 2017-2018 fuse boxes are flat and you could fit a 12 fuse block spun 90 degrees from the above picture if you'd like. The 12 fuse block would allow you to keep all of the pass-thru wires plugged in. I would have gone this route if I had a 2017 or 2018.
ATO Fuses for Block: Could easily get at any auto parts store too.
16AWG Wiring: Aux 1 and 2 are 16AWG and 3 thru 6 are smaller, however there is no harm in just staying consistent with 16AWG for all of them. With wire sizes, bigger is okay. Smaller is no bueno.
Heat Shrink Connectors: This kit includes a number of different connectors that you can use for grounds. I personally don't like to use the heat shrink spade connectors because they warp, but you can if you'd like. If you don't want to solder, this kit also comes with the heat shrink connectors. You definitely want to
Spade Connectors: I use these for all the connections to the fuse block. Now you don't have to use spade connectors but they will work with the linked above fuse block and this is the standard connection for Bosch relays if you plan to utilize any relays in the future.
Heat Shrink Tubing: I actually only like to get the Commercial Electric stuff from Home Depot. A lot of the tubing you can find online from places like Amazon stays a little sticky. The Commercial Electric seems to stay less sticky after shrinking.
Now you'll also need some standard tools such as a heat gun for the heat shrink, solder gun if you intend to solder like I did, wire stripper, crimper, multimeter, zip ties for organizing, and a label maker if you'd like to label your stuff. I have a Brothers P-Touch to label everything.
Step 1: Read Your ******* Manual
I know this is going to hurt a lot of your pride, but you need to. Specifically the Raptor supplement. In here you will find the guide for your aux wiring. The problem is that Ford changed the wire color pretty much every year, and they didn't make it any easier by occasionally using some of the same wiring colors in different spots. So, get this info and keep it handy.

Step 2: Find AND TEST the Wires
There are two bundles of wires with the same coloring that you'll find tucked between the battery and firewall. One of these bundles has all the 12v + wiring that feeds off the aux switches. The other bundle is a set f pass-thru wires that you can access the other end of behind the passenger fuse box inside the cab. There are multiple reports of these bundles being "flipped" so do yourself a favor and check which ones are actually hot when the aux switches are flipped on.
Step 3: Prep Your Extension Wires
I did 18" wires which is more than enough to have plenty of slack to move around that area, and also to pull off the factory fuse box cover if you need to without unplugging all your aux stuff. So, I cut six (6) red wires for the hot wires from the aux switches and six (6) blue wires for the pass-thru wires to the passenger fuse box. in the house I crimped on the spade connectors (female end), heat shrunk around those, and added my labels so I could knock all that out in a controlled environment. Once that was all done I stripped the other end of those wires and pre slipped on the heat shrink tubing for that connection. Always slip on your heat shrink as soon as you're ready!! Nothing is worse than when you finish connecting some wiring, grab your heat gun, and realize you never slipped it on.
Step 4: Solder (or Crimp) Your Extended Wires On
This is the part that really sucks. The factory wires are short and you're going to be awkwardly laying across your engine bay trying to get this done. But again, with this setup this is the ONLY time you'll ever have to do this. Now, I soldered on my extended wires and heat shrunk over those solders because this is the most secure way you can splice wires together. If you are not comfortable with soldering, especially in an awkward spot like this, then I would recommend using heat shrink butt splices. Some of these are included in that kit in the parts list above. Full disclaimer, if you are using butt splices, USE THE HEAT SHRINK ONES. These will give you the next best hold in case a wire ever gets tugged next to soldering.
Step 5: Plug It All In
Guys that's pretty much it, this is really simple. At this point. Attach your fuse block to your factory fuse box cover (I bolted through the cover but you could use adhesive or velcro too). And this is the best part of this setup, now everything just simply plugs in. Congrats!
Step 6: Cap Any Unused Hot Wires
Even if they are switched, make sure you cap any unused hot wires in your system. The pass-thru wires are fine because they aren't hooked up. You can see in the pictures where I put a little spade connector with electrical tape in the fuse block for switches 5 and 6. Safety First.
Optional Step 7: Prep Your Pass Thru Wires
I went into the panel where the passenger fuse box is, where the other end of the pass-thru wires are, and added quick connectors + labels on those.


