Noice.She stays planted!
You are using an out of date browser. It may not display this or other websites correctly.
You should upgrade or use an alternative browser.
You should upgrade or use an alternative browser.
Group Buy: Krazy House Customs Torque Arm for the 2017+ Raptor
- Thread starter smurfslayer
- Start date
Disclaimer: Links on this page pointing to Amazon, eBay and other sites may include affiliate code. If you click them and make a purchase, we may earn a small commission.
- Status
- Not open for further replies.
sixshooter_45
2019 Ruby Red Metallic SC, 3.5 L Twin Turbos.
Noice.
No I don't use any ice. LOL!
Raptus
Full Access Member
Confirmed with KHC, you can install springs before or after and no issue. If installing springs after install of torque arm, you will need to re-adjust torque arm mounting/angle.
What is required to re-adjust the torque arm mounting angle after the installation of Deaver +3’s?
Thanks in advance!
Sent from my iPhone using Tapatalk
@Raptus
You will likely need to loosen the bolts and potentially adjust the angle at these parts mount to the axle. Adding the slightly taller leaf springs will in most instances change the angle at which the torque arm attaches to the axle.
You will likely need to loosen the bolts and potentially adjust the angle at these parts mount to the axle. Adding the slightly taller leaf springs will in most instances change the angle at which the torque arm attaches to the axle.
PlaynCA
Active Member
Driveway install tips to supplement the instructions:
1) drop the spare
2) disconnect brake clip, pull them forward, then cut notch...very simple with a rotary cut off tool...if you cut too large, no problem as the kit comes with a nice replacement plate that is larger, just don’t nick your brake lines with the cutter
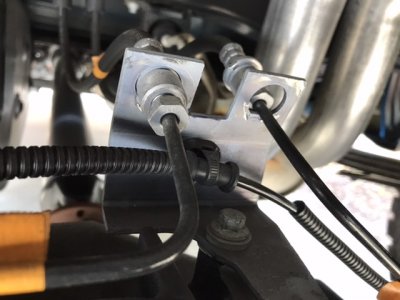
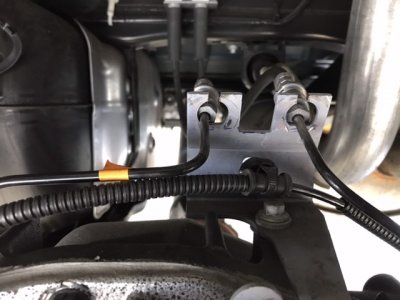
3) cover the connector on the left side of the differential with duct tape or something to keep the metal sparks off it and notch the plate on the left side of the axle with a rotary cut off tool, this one is a little more challenging...first attempt I didn’t make notch large enough ( first pic) and had to fit the kit, remark and renotch it larger ( 2nd pic)...then file smooth, blow off all metal grinding and paint. I found it easiest to cut from the front side of the axle while watching my cut from the back side.
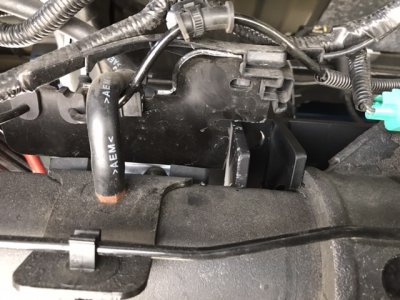
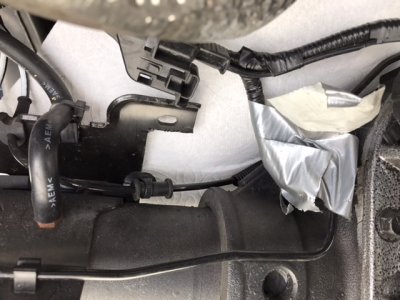
4) install the kit on the differential per instructions; keep the axle clamp/rear skid braces (see pic below) very loose and assemble the top and front mount and run front skid bolts all the way down, then back a turn or so ( slightly loose); then un bolt the axle /rear braces enough to raise the rear of the skid while clearing the rear skid braces...once the rear of the skid is up, re bolt up the axle/ rear braces and bolt the rear braces to the rear of skid. Snug everything in increments, then tighten fully.
Note; KHC must have awesome jigs as the top brace needed to be rocked into place on the axle, (absolutely no slop on the differential)
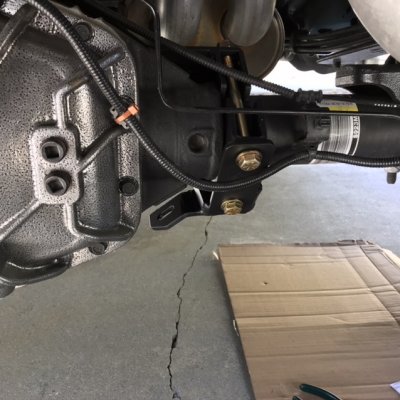
5) Mark position of the driveshaft and remove it before test fitting the torque arm and marking the holes to drill in the cross member.
The rest of the instructions provided should Work well for you.
Other helpful tip is look at all of the pics on the KHC website of the kit from different angles, it will help orient you with exactly how it all fits together.
1) drop the spare
2) disconnect brake clip, pull them forward, then cut notch...very simple with a rotary cut off tool...if you cut too large, no problem as the kit comes with a nice replacement plate that is larger, just don’t nick your brake lines with the cutter


3) cover the connector on the left side of the differential with duct tape or something to keep the metal sparks off it and notch the plate on the left side of the axle with a rotary cut off tool, this one is a little more challenging...first attempt I didn’t make notch large enough ( first pic) and had to fit the kit, remark and renotch it larger ( 2nd pic)...then file smooth, blow off all metal grinding and paint. I found it easiest to cut from the front side of the axle while watching my cut from the back side.


4) install the kit on the differential per instructions; keep the axle clamp/rear skid braces (see pic below) very loose and assemble the top and front mount and run front skid bolts all the way down, then back a turn or so ( slightly loose); then un bolt the axle /rear braces enough to raise the rear of the skid while clearing the rear skid braces...once the rear of the skid is up, re bolt up the axle/ rear braces and bolt the rear braces to the rear of skid. Snug everything in increments, then tighten fully.
Note; KHC must have awesome jigs as the top brace needed to be rocked into place on the axle, (absolutely no slop on the differential)

5) Mark position of the driveshaft and remove it before test fitting the torque arm and marking the holes to drill in the cross member.
The rest of the instructions provided should Work well for you.
Other helpful tip is look at all of the pics on the KHC website of the kit from different angles, it will help orient you with exactly how it all fits together.
Last edited:
Booth9999
Professional basket weaver level 7
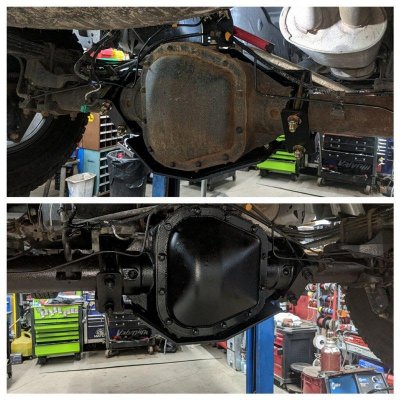
Ouch! Poor truck, I forget now bad the salts and weather eat up the trucks. That looks like a 10yr old California truck. You need some Amsoil HDMP bad!Ok jokes aside. I usually do work myself on my truck but I've been busy with stuff at home and there's all kinds of crap scattered across my garage floor so I had no room or time to do this.
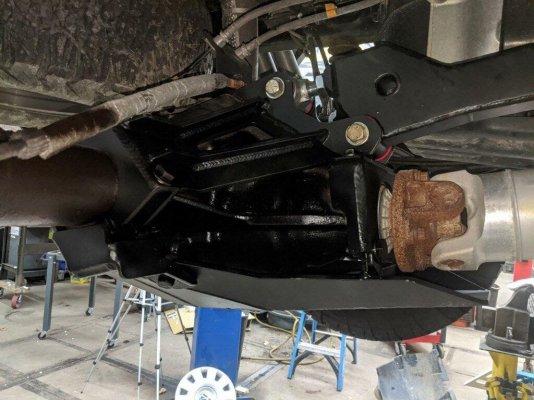
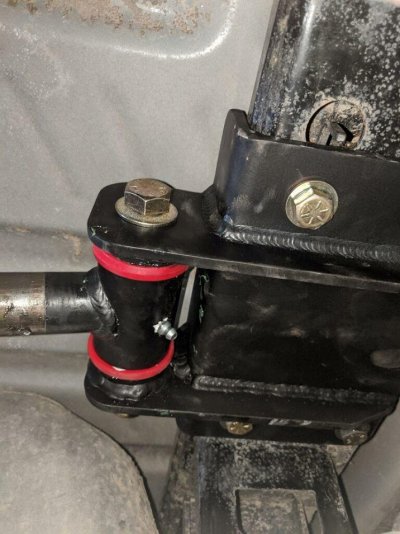
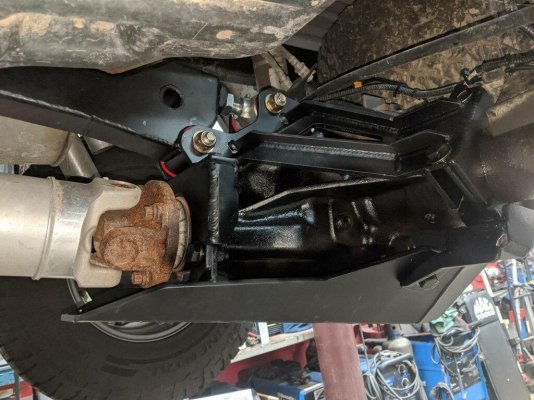
Luckily OffRoadAlliance @FordRaptorLights.com isn't too far from me and I had them do it for my lazy ass. Jeff is excellent and I wouldn't hesitate to have him and his shop do any work on my truck or for the local guys around us lucky to have him around!
It's a huge improvement and basically plants the axle to the ground. I have the MPT 93PRX tune and in sport mode 2wd I didn't get any wheel hop all there is the sweet sweet squeal of rubber and then forward thrust.
Pics sent from Jeff during the install
invalidusername
Full Access Member
Ouch! Poor truck, I forget now bad the salts and weather eat up the trucks. That looks like a 10yr old California truck. You need some Amsoil HDMP bad!
It's not that rusty, some of the stuff is mud stains from Summer RTO at Rausch Creek. I tried to wash most of it off but it's like permanent without a good scrub.
- Status
- Not open for further replies.
Similar threads
- Replies
- 6
- Views
- 2K
- Replies
- 0
- Views
- 448
- Replies
- 2
- Views
- 1K
Members online
- Lunar
- STHenry
- frankenwerx
- MSM
- Kylejordan12
- Jesse1983
- Shark
- OldEngr
- NateS
- JeepSRT8
- RdR2027
- SVTNate
- kevlar68
- Rap19
- gatorbyteme
- bbarr97
- sfmackie
- bbarnesnc
- Brent Lester
- arobertsmith
- dinocrisis
- 8obbylee
- dj30417
- ndecker2
- Canuck714
- RaurNaur
- Josfue
- byounge
- darkryder
- TomDirt
- BBR
- 1RaptorFan
- weldoid
- fuqtodd
- New recaros
- Carmanjp
- dillard09
- FML
- GordoJay
- Babalu
- Mad Zeus
- PK37
- F150Custom
- Gorzz
- ou213803
- northlaker
- rainhoff
- 1BAD454SSv2
- dukesraptor
- WickedGnarly
Total: 4,234 (members: 129, guests: 4,105)

