First time Front Shock rebuild

Disclaimer: Links on this page pointing to Amazon, eBay and other sites may include affiliate code. If you click them and make a purchase, we may earn a small commission.

Jhollowell

Full Access Member
Joined
Mar 14, 2016
Posts
821
Reaction score
834
Location
Everett, wa
Hey guys, I'm attempting to rebuild my front shocks and had a few questions. I did read all 39 pages of the sticky thread so i think i have a good handle on it but had a few questions.

1. When powder coating the shock body (silver tube) does the added thickness of the powder coat make it difficult to slide the perch back on?
2. Has anyone tried a different lock ring for the perch? I found a company that makes custom lock rings in stainless steel so i am going to reach out to them to see if i can get a few. This would hopefully help with the corrosion issues we have with the steel rings.
3. What do you do with the old suspension fluid? I have a hazardous waste facility near me which accepts hydraulic and trans fluid. Should i just tell them its hyd fluid?
4. I'm planning to install the schraeder valves from Forged Offroad. Do you guys seal the threads with anything?
5. Has anyone used a hydraulic press to compress the springs for removal and install? I've got Geisers on mid perch and was planning to use a 20 ton HF press with some custom adapter plates to hold the shock. I'm planning to support the shock by the perch with a steel plate with a hole, and then fabricating some kind of adapter to go on the top hat that allows access to the nut on the shaft. Curious if anyone has tried this method.
6. How far do you thread the nut on the shaft? When i originally installed the Geisers i used a professional floor mounted spring compressor and that took everything i had to compress it enough. If i remember correctly i just threaded the nut on an arbitrary amount and it seems to be fine but was wondering if there was a spec?
 

BenBB

FRF Supporting Member
Supporting Member
Joined
Apr 21, 2016
Posts
1,819
Reaction score
2,491
Location
Lots of different places
My take;
1. It might, just the decal alone makes moving the perch difficult, had to use a 12-ton press to move to mid perch (partially because I forgot Mr. Setscrew, d'oh).
2. I haven't but it's a simple round external snap ring, no reason why SS wouldn't work if it's the same ID and cross-section. Would try!
3. Yes.
4. I used blue loctite, others have used teflon goo, not sure if either is the RIGHT one.
5. That would work (see #1), the spring compressor I used (cheap ebay version of sounds like the Brannick you used, not a regular press) is just a bottle jack and some lobster claws that engage the spring coils; if you can rig up something on a press that won't slip and rocket the spring into orbit, I say go for it.
6. Torque spec is 41ft-lb for the shock shaft nut, it should have like half an inch of threads visible (below the hex top of the shaft, use that hex with an 8 or 10mm whatever it is to tighten the nut) when it bottoms out the top hat against the shock shaft square shoulder.
 
OP
OP
Jhollowell

Jhollowell

Full Access Member
Joined
Mar 14, 2016
Posts
821
Reaction score
834
Location
Everett, wa
Thanks man thats helpful. I like the idea of compressing the spring with everything in line and nothing cantilevered off the side. As for the powder coat, i see that TSW offers it so i'm guessing you can still get the perch on after coating. I'll add the decals and protective wrap after the perch is on. I'll send an email today about the retaining clip and keep you guys informed.
 

The Car Stereo Company

aka grumpy car stereo guy and frf rolodex
Supporting Member
Joined
Jul 8, 2012
Posts
32,689
Reaction score
23,780
Location
here, on frf
i thought stainless and aluminium, dont play nice together?

go to autozone and rent their big spring compressor. i bought one and i use a 1/2in ratchet (ok, i lied, 1/2in impact cause im impatient) and it works great.

as for the rest of it, just hurry it up and figure it out. my daughter lives in seattle, i want to send her home with my spare shocks for you to rebuild. see how nice i am? letting you rebuild my shocks in the name of science, and i wont even complain about their life expectancy.
 
OP
OP
Jhollowell

Jhollowell

Full Access Member
Joined
Mar 14, 2016
Posts
821
Reaction score
834
Location
Everett, wa
Hell yeah man!! I'm always up for practicing on other peoples parts...lol

As for the stainless vs aluminum i know we put stainless bushing in aluminum structure on aircraft but maybe they do something to the stainless to treat it so it doesn't react with Al. Either way the company i was going to use requires a business email to have samples made so that's not going to work for me. What i'm going to do is powder coat the body, but mask the retaining ring groove since i don't want to add any thickness in there. Then i'll cerakote the whole thing with clear, including the ring. Then add decals and wrap with 3M clear sheet. The last set of shocks i refinished only had cerakote and they still look great. I sent those shocks out to get rebuilt so i could only coat them with something that didn't require oven cure. I'll take pics and keep you posted on how it goes.
 
OP
OP
Jhollowell

Jhollowell

Full Access Member
Joined
Mar 14, 2016
Posts
821
Reaction score
834
Location
Everett, wa
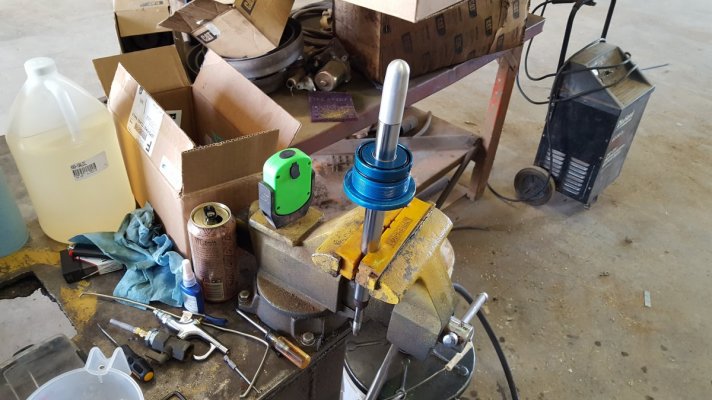
I'm having a hell of a time getting the top cap back on the shaft without trashing the seals. I destroyed both middle wipers trying to get the cap on even using a bullet tool. I'm 99% sure the seals are installed the correct orientation but it feels like it's hitting a solid shelf when i try to get the cap on. Does anyone have any suggestions on how to get this thing back on? i had to use a mallet and hit it pretty hard to get it to go and some of the videos i've seen show them installing it by hand so i feel like i'm missing something. Is it easier to take the shim stack off the bottom and install the top cap from the bottom? I watched this guy and he has a drawing of the seals and thats how i had them installed but still couldn't get it together without damaging the seals. This video shows a diagram of the seals and thats how mine are installed. Video @13:40 Any advice would be greatly apperciated
 

BenBB

FRF Supporting Member
Supporting Member
Joined
Apr 21, 2016
Posts
1,819
Reaction score
2,491
Location
Lots of different places
From the DIY thread pdf:
Screenshot 2023-02-25 113839.jpg
Use lotsa oil, with the bullet it should be relatively painless but might need some persuasion, I don't remember if I had to smack mine with a mallet:
20180323_102752.jpg
 

The Car Stereo Company

aka grumpy car stereo guy and frf rolodex
Supporting Member
Joined
Jul 8, 2012
Posts
32,689
Reaction score
23,780
Location
here, on frf
From the DIY thread pdf:
View attachment 395313
Use lotsa oil, with the bullet it should be relatively painless but might need some persuasion, I don't remember if I had to smack mine with a mallet:
View attachment 395314
um..... what kind of bullet are you talking about there? cause what you posted and the orientation of it, well i guess its something for @Oldfart .
 
Top