You are using an out of date browser. It may not display this or other websites correctly.
You should upgrade or use an alternative browser.
You should upgrade or use an alternative browser.
GEN 2 E&G Console Safe Install: A World Class Goat Rope
- Thread starter NHnewbie
- Start date
Disclaimer: Links on this page pointing to Amazon, eBay and other sites may include affiliate code. If you click them and make a purchase, we may earn a small commission.
One of my next purchases. Thanks for the info.
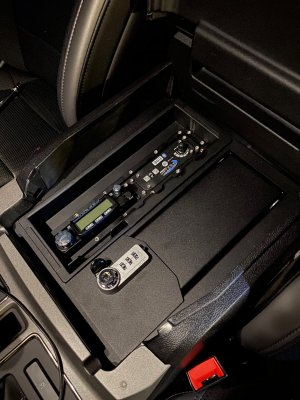
Is anyone running one of these a race radio? Curious if their bezel mount works next to this safe.
Yep, we've had plenty of folks do that including @Chad-ApolloOptics
He'll chime in with the pics of his console setup!
Yep, we've had plenty of folks do that including @Chad-ApolloOptics
He'll chime in with the pics of his console setup!
Sounds good. Thanks for the quick reply!
GhostRHR
Full Access Member
i've had a similar issue with the lid not closing i have to slam it a bit but it will latch a little closer than i wish it was but it works.
smurfslayer
Be vewwy, vewwy quiet. We’re hunting sasquatch77
- Joined
- Dec 16, 2016
- Posts
- 17,566
- Reaction score
- 27,056
#ThreadResurrection

Tip from recent install. As many noted previously, the bottom bracket is bent making the front bolts too short. The bracket is installed under the console, but: It’s not held in place up front. You can do this by yourself.
Position the bracket as described in the previously mentioned video: https://www.americantrucks.com/e-g-center-console-lock-vault-1517.html
If 2 of the 4 bolt holes are lined up, celebrate your awesomeness with a pint. After the pint, with the console lid and safe lid opened, from the rear of the cabin, standing , assume a position standing over the center console, lid open, similar to ... well... something you might do with your wife. Apologies ladies, not sure how to explain it for y’all.
My wife interrupted me during this process. I’m pretty sure I talked my way out of any serious trouble.
Using your left foot, press on the metal bracket and the front of the bracket will lift up, almost miraculously making the front bolts fit-ish. Start, but do not fully tighten the bolts up front.
Celebrate that you are skilled at left foot braking and your enhanced awesomeness with another pint.
Now that the 2 rear holes are out of alignment you can
- hog out the holes you drilled in the plastic to give yourself more room
- from the front seat, angle the still loose console because you haven’t tightened the front bolts yet
- both
Start the bolts in the rear
Once you’re sure you haven’t x-threaded anything tighten things up, slowly but surely.
Reassemble in the reverse order you disassembled.
Upon completion, you should have no more than one extra bolt and all in it’s a 2 pint job, tops.
Similar threads
- Replies
- 0
- Views
- 722
- Replies
- 14
- Views
- 3K
- Replies
- 6
- Views
- 648


