DezRaceSVT- 2013 Build Thread

Disclaimer: Links on this page pointing to Amazon, eBay and other sites may include affiliate code. If you click them and make a purchase, we may earn a small commission.

OP
OP
DezRaceSVT

DezRaceSVT

Full Access Member
Joined
Jul 11, 2012
Posts
331
Reaction score
184
Location
San Diego
This is with the Roto Pax installed its nice and tucked out of the way and it still clears the wheel well.
roto pax use.jpg

Next thing that I added was the magnetic radio antenna.
wilson ant.jpg

I also added a fire ext. to the bed rack the mount that I bought was a little pricey but it was the sturdiest and had the least amount of movement.
fire ext.jpg
 
OP
OP
DezRaceSVT

DezRaceSVT

Full Access Member
Joined
Jul 11, 2012
Posts
331
Reaction score
184
Location
San Diego
Up next I installed my CB radio. I got a Cobra 75 WX ST. I chose to get this radio because of how compact it is and the price. I will start with the install from the antenna and move towards the control box just so you can see how I chose to install it. First you can see that I mounted the antenna on the bed rack.
br ant.jpg

I then chose to have the coax cable come into the cab underneath the rear seats. I had to use a little pressure tape to make a tight fit with the pass through grommet. When I’m not using the radio I can just remove the coax cable and install a fully sealed plug. You can see in the first pic where the cable enters the cab and in the second you can see where it comes in.
ant in cab.jpg
coax in cab.jpg
I then ran the cables under the rear floor mat beside the passenger seat then I will tuck them between the carpet and the center counsel like this but all the way hidden you won’t be able to see anything.
cables center counc.jpg
 
Last edited:
OP
OP
DezRaceSVT

DezRaceSVT

Full Access Member
Joined
Jul 11, 2012
Posts
331
Reaction score
184
Location
San Diego
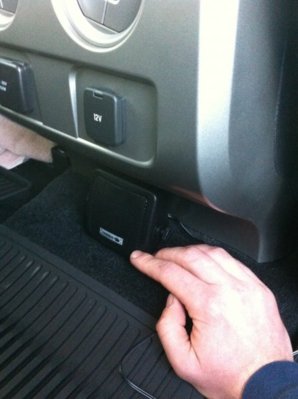
Now on to the control box. I was first going to mount it on the center counsel but I wouldn’t be able to have quick access to it and I would have to take the center counsel apart every time I removed the coax cable for the antenna. With this setup it takes less than 5 minutes to install the antenna coax. I mounted the control box in the left hand side of the glove box. It’s nice and small and won’t take up to much room. At first I had it hard wired but I didn’t want to drain the battery and have to remove the mic when not in use. So I wired it to AUX 4 which is a 10 amp. I know that’s high for the radio but the radio is equipped with a smaller fuse that will pop if anything happens.
You can see that the coax cable comes in from the back of the glove box. I have a power and ground that you can see and the black mic cable. I grounded the radio to one of the air bag mount bolts. The second pic is behind the glove box.
glove box.jpg
behind glove box.jpg
I have heard that the all in one radios don’t have the best speaker so I picked up a small Uniden speaker since the control box has a speaker jack. I’m still not sure where I want to mount it. My two choices are under the rear seats where it’s always out of the way but the speaker only has a 6 foot cable and if I mount it there I will have to extend the cable by two feet. Or my second location would be right behind the center counsel. Here the cable will reach and it looks like should be there. The contours of the counsel and the speaker are the same but the down side would be that it could be kicked.
 

Attachments

  • uniden.jpg
    uniden.jpg
    44.5 KB · Views: 71
Last edited:
OP
OP
DezRaceSVT

DezRaceSVT

Full Access Member
Joined
Jul 11, 2012
Posts
331
Reaction score
184
Location
San Diego
I forgot one more pic. the antenna legnth is 62" so it sticks up about 3 1/2 feet above the cab.
ant in truck.jpg
 

MagicMtnDan

FRF Addict
Joined
Oct 28, 2011
Posts
7,661
Reaction score
1,795
Location
Magic Mountain
Very nicely done - ALL of your mods are trick and it's cool that you're showing everyone how you did them.

I wonder how the CD radio antenna will work in that location with minimal steel underneath it. Do let us know as that's a trick install too.

Well done!
 
OP
OP
DezRaceSVT

DezRaceSVT

Full Access Member
Joined
Jul 11, 2012
Posts
331
Reaction score
184
Location
San Diego
The antenna mount will be fine. The magnet is very strong and the steel mount is very sturdy. Alot stronger than the roof.
 
OP
OP
DezRaceSVT

DezRaceSVT

Full Access Member
Joined
Jul 11, 2012
Posts
331
Reaction score
184
Location
San Diego
I have a few more mods and updates that I took care of. I installed the
Nav-TV VIM bypass. Thanks again Noah for a smoking deal. The install wasn't bad. Nav-TV's instructions suck so if you are doing this just use Noah's install video in the vendor section (The Car Stereo Company).
This is after all the connections were made.
photo.jpg

I was also reading up on Plasti dip and I thought I would five it a try so I sprayed the chrome shifter and the cup holder trim I like the change. I dont think the chrome looks that good in these trucks.
plasti dip.jpg

While I was at the store I also seen that they had a spray and a dip so I wanted to try this as well. So I dipped the cargo strap clamps just for the hell of it. So far I like the outcome.
plasti dip tie down.jpg
 
Last edited:

onesickpuppy

FRF Addict
Joined
May 20, 2012
Posts
1,443
Reaction score
309
Location
Ruler of the Earth
Looking good Dez... amen on the Nav instructions.... I think they make you scratch your head WAY too much, and second the thanks Noah for video and deal!!!
 
OP
OP
DezRaceSVT

DezRaceSVT

Full Access Member
Joined
Jul 11, 2012
Posts
331
Reaction score
184
Location
San Diego
More updates for you guys.

I forgot I had a puke bag as a promotional gag a few years ago so thats in the glove box.
puke bag.jpg

I also found a SVT Badge. Its a nice quality, all aluminum and painted.
svt badge.jpg

I made a whip mount that utilizes the back two bed mounting bolts. Its a little overkill but Ill be flying a 3x5 ford racing flag and I can cargo strap a cooler to it.
whip mount.jpg

The next thing that I added was a 700 lumen 3 LED light under the hood with a on/off toggle switch. This is the same mod as another member did. Its a little overkill but the engine bay will have no spots not covered by the light.
eng light.jpg
eng light switch.jpg
 
Last edited:
OP
OP
DezRaceSVT

DezRaceSVT

Full Access Member
Joined
Jul 11, 2012
Posts
331
Reaction score
184
Location
San Diego
I also got into the Plasti Dip and painted the front and rear bumper along with the side fenders. The look is so much better than the stock grey that dosent match the anything on our trucks.
wraped front bump plast.jpg
front bump.jpg


The cool thing about plasti dip if you dont know is that you can peel it off in one sheet with no damage to the paint and so pre sanding needed. You can see on the pic of the rear bumper I purposely over sprayed onto the plastic part of the bumper and after it dried i peeled it off of the plastic.
plast rear bumper.jpg
front flair.jpg
plast rear flair.jpg
 
Last edited:
Top