CVFab Titan 2 installed

Disclaimer: Links on this page pointing to Amazon, eBay and other sites may include affiliate code. If you click them and make a purchase, we may earn a small commission.

Shark

Full Access Member
Joined
May 21, 2011
Posts
169
Reaction score
335
Location
Frisco, TX
I’m not sure that there is even that much to gain with the new pipes, to be honest. Not sure I would spend the extra time and money on them if I was to have a do over.

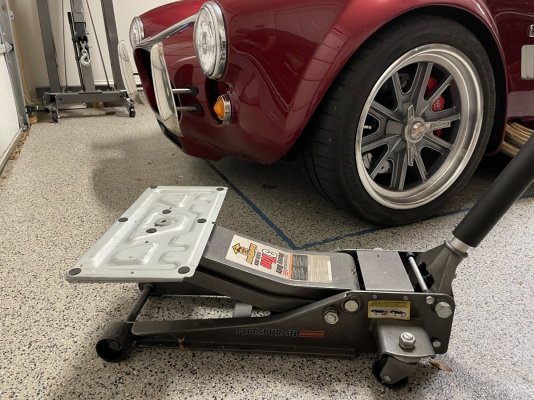
Getting the IC and fan into place was fairly easy aside from the extra trimming I had to do after removing the shroud. I have a metal plate that is about 8” x 16” that came out of the base for an old TV stand. I drilled a hole in the middle and I can replace the standard lift plate on my floor jack to turn it into sort of a trans Jack. This floor jack "hack" came in very handy when I built my Factory Five a few years ago. I just put the IC with the fan right behind it on the Jack, and jacked them up together right into place. I had zero issues with the fan.
IMG_3412.jpg
 
Last edited:

khildebr

Full Access Member
Joined
Jul 13, 2021
Posts
195
Reaction score
287
Location
Pleasant Valley
Okay, it sounds like you put both the fan and IC on the jack and lifted them into place at the same time. In their description of the install process at the start of this thread, @cdiddy4224 said:
I placed the fans up in their location before sliding in the Titan 2. If you try to iput the Titan 2 in first, then the fans, there isn’t enough clearance. Place the fans up in their location, then slide the IC in.
That could explain why you needed to trim off the extra portion of the shroud.

BTW - Nice “jack hack” with the TV base. Looks more stable than a piece of wood resting on the lift plate.
 

jm77

Full Access Member
Joined
Aug 31, 2021
Posts
362
Reaction score
322
Location
USA
I messaged Jasonat CVF and was assured that there shouldn’t be any need to modify the shutters aside from removing the shroud. Maybe a one off problem or user error. @Shark what year is your truck?
 

Shark

Full Access Member
Joined
May 21, 2011
Posts
169
Reaction score
335
Location
Frisco, TX
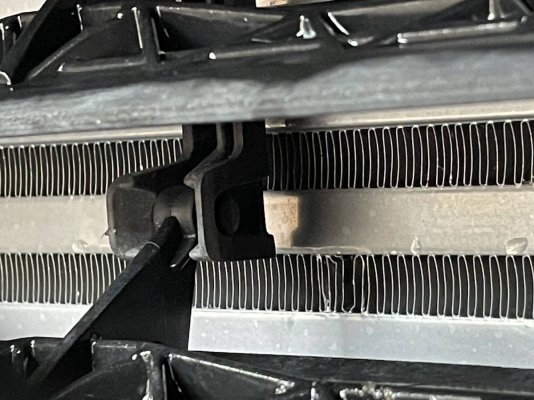
My truck is a 2017. Here is a pic showing how close the shutters are to making contact after install, they are not touching but are very close. I had the IC all the way up and pushed all the way forward and felt around the grommet and the hole in the bracket. It was lined up, but not yet in the hole and I could see it making contact on the sides. I may have been able to tilt the IC to get it in, but that would have kicked out the rear. The fan is in the rear so don't see how that could have affected it. Yeah it's weird if it is sliding right into place for others. The only thing I can think of is maybe there is some variable in the placement of the top bracket at the factory and mine was just more forward than normal. User error is always a distinct possibility as well!IMG_3413.jpg
 
Last edited:

catinthehat85

Full Access Member
Joined
Jan 8, 2019
Posts
342
Reaction score
340
Location
Socal
My truck is a 2017. Here is a pic showing how close the shutters are to making contact after install, they are not touching but are very close. I had the IC all the way up and pushed all the way forward and felt around the grommet and the hole in the bracket. It was lined up, but not yet in the hole and I could see it making contact on the sides. I may have been able to tilt the IC to get it in, but that would have kicked out the rear. The fan is in the rear so don't see how that could have affected it. Yeah it's weird if it is sliding right into place for others. The only thing I can think of is maybe there is some variable in the placement of the top bracket at the factory and mine was just more forward than normal. User error is always a distinct possibility as well!View attachment 383552

You’re also posting in a gen 3 forum, so there’s that…I installed it on my gen 3 zero need to trim anything.
 

khildebr

Full Access Member
Joined
Jul 13, 2021
Posts
195
Reaction score
287
Location
Pleasant Valley
Got my Raptor back from the shop after they did the install of the Titan v2 as it has gotten too cold and wet here to work on it myself and the Raptor doesn’t fit through the garage door. :mad: I gave them the instructions from the Cobb IC along with @cdiddy4224 ’s posts to follow as there weren’t any printable ones that I could find on the CVF site. Tech said it went smoothly and that there really isn’t a lot of extra room even with the fans put in prior to lifting the Titan into place.

Now the question is how mush of a drop in the charge temp should one expect to see? It’s currently 43 degrees outside air temp and the initial reading showed 110 degrees while sitting still and then a drop down to 77 degrees while driving but that would fluctuate going up into the 90s on occasion. I’m assuming the initial high temp and fluctuations while driving are due to the shutters opening and closing as the computer tries to hit an “ideal” temperature for the charge air but want to make sure that they didn’t botch the install.
 

Shark

Full Access Member
Joined
May 21, 2011
Posts
169
Reaction score
335
Location
Frisco, TX
Got my Raptor back from the shop after they did the install of the Titan v2 as it has gotten too cold and wet here to work on it myself and the Raptor doesn’t fit through the garage door. :mad: I gave them the instructions from the Cobb IC along with @cdiddy4224 ’s posts to follow as there weren’t any printable ones that I could find on the CVF site. Tech said it went smoothly and that there really isn’t a lot of extra room even with the fans put in prior to lifting the Titan into place.

Now the question is how mush of a drop in the charge temp should one expect to see? It’s currently 43 degrees outside air temp and the initial reading showed 110 degrees while sitting still and then a drop down to 77 degrees while driving but that would fluctuate going up into the 90s on occasion. I’m assuming the initial high temp and fluctuations while driving are due to the shutters opening and closing as the computer tries to hit an “ideal” temperature for the charge air but want to make sure that they didn’t botch the install.
Congrats on getting it installed. Do the Gen3 raptors include a gauge to read the charged air temp? I was hoping for one on my 2017, but the only options for the custom gauge are Boost psi and Trans Temp.
 

khildebr

Full Access Member
Joined
Jul 13, 2021
Posts
195
Reaction score
287
Location
Pleasant Valley
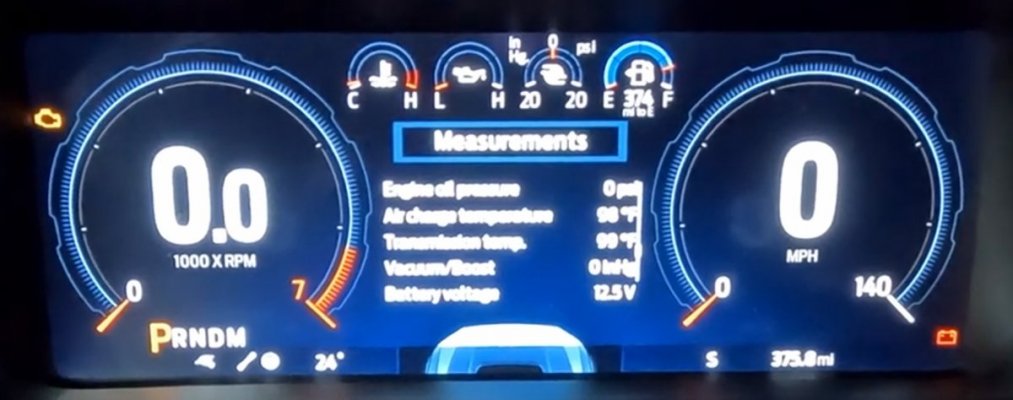
Congrats on getting it installed. Do the Gen3 raptors include a gauge to read the charged air temp? I was hoping for one on my 2017, but the only options for the custom gauge are Boost psi and Trans Temp.
Yes. Here’s a screen grab from a video on YouTube showing the measurements display. E7478FEC-0D53-4BB0-A538-EE43AF77DE5B.jpeg
 
Last edited:

khildebr

Full Access Member
Joined
Jul 13, 2021
Posts
195
Reaction score
287
Location
Pleasant Valley
Now the question is how mush of a drop in the charge temp should one expect to see? It’s currently 43 degrees outside air temp and the initial reading showed 110 degrees while sitting still and then a drop down to 77 degrees while driving but that would fluctuate going up into the 90s on occasion. I’m assuming the initial high temp and fluctuations while driving are due to the shutters opening and closing as the computer tries to hit an “ideal” temperature for the charge air but want to make sure that they didn’t botch the install.
Well things have settled down on the air charge temperatures and they are staying in the low 70s with outside air temps still in the 40s. So it appears that my earlier air charge temp fluctuations were due to the ECU sorting out the new larger intercooler. Feeling better about the intercooler and the installation. :)
 

jm77

Full Access Member
Joined
Aug 31, 2021
Posts
362
Reaction score
322
Location
USA
Got the titan installed in my truck today. Not entirely hard but an extra set of hands and a jack are definitely appreciated/needed.

I can see how it would seem that the shutter needs to be cut as it looked like it was a 1/2” off. Trick is to angle the IC top forward a bit. Hard to do as it’s a tight fit but it does line up. It sits right up against the shutter.

If you install the cold side elbow before sliding the cooler in I’d recommend taping the open end off to prevent any debris from falling in while sliding it into position.

I also ended up fitting some thick washers under the rubber lower gromets on the fan to prevent the movement others have mentioned.
 
Top