GEN 2 Baja Designs S8 30" Grill Light bar kit install

Disclaimer: Links on this page pointing to Amazon, eBay and other sites may include affiliate code. If you click them and make a purchase, we may earn a small commission.

hamster

FRF Supporting Member
Supporting Member
Joined
Mar 14, 2016
Posts
1,174
Reaction score
863
Location
Northern VA
Cool! You need to step it up though, XL80’s on the hood to complete the equation.
I broke those same clips on Lucille and never even bothered chasing it down. You can’t tell by looking and it’s not like anyone else knows those clips broke.

of course, now that I know, this will gnaw at me until I fix them. Thanks for that.

:confused:

Nope....nothing mounted up on hood for me....lile the semi-subtle look and really want no problems at the car wash. :)

Hey if you want some of the clips, just PM me your address and how many u need and I will mail them to u....seems fair since u talked me into the S8.
 

smurfslayer

Be vewwy, vewwy quiet. We’re hunting sasquatch77
Joined
Dec 16, 2016
Posts
17,875
Reaction score
27,746
Hey if you want some of the clips, just PM me your address and how many u need and I will mail them to u....seems fair since u talked me into the S8

meh... we’re close enough. no need for USPS.
I can pay with bourbon...Bourbon country
;-)
 

hamster

FRF Supporting Member
Supporting Member
Joined
Mar 14, 2016
Posts
1,174
Reaction score
863
Location
Northern VA
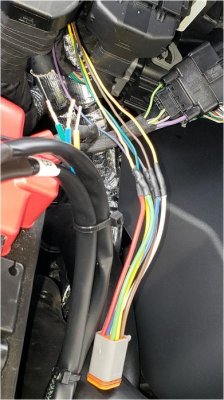
Well finally finished wiring the S8, ONX6+ and BD pocket lights. I wanted wire all of them at once so I could get a clean OEM wiring look under the hood. First thing I did was extend the OEM wires using a Deutsch 6-pin Pigtail. I got the idea from this forum, but can't recall where. Here is link to where I got it. All connections were soldered and the used heat shrink tubing that has adhesive to better seal out the elements.

https://www.ebay.com/itm/Deutsch-DT...e=STRK:MEBIDX:IT&_trksid=p2057872.m2749.l2649


Wire0.jpg

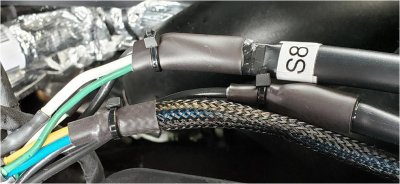
Notice the wiring harnesses in picture above. Depending on how you route the wires, you could have a lot of excess harness for some of them. The pocket light harness was just the right length for me. So I shortened up the other two harnesses (S8 and ONX6+) and then resealed the ends. See below.

Wire1.jpg
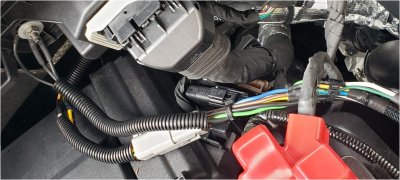
At first I had it like the following with materials I had on hand. It would have been perfectly fine to stop here.

Wire2.jpg


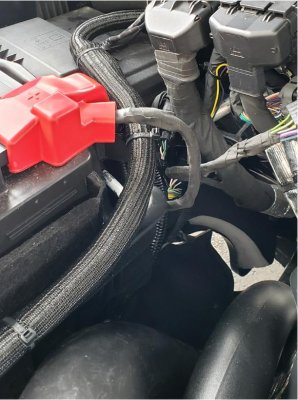
But then I ran across this on Amazon and used it to finish it off more like OEM. Had to remove a few of the tie wraps in the above pictures before I installed it.

https://www.amazon.com/gp/product/B07FW672R7/?tag=fordraptorforum-20


Wire3.jpg
 

smurfslayer

Be vewwy, vewwy quiet. We’re hunting sasquatch77
Joined
Dec 16, 2016
Posts
17,875
Reaction score
27,746
I may need to hire you to tidy up my install.
well done!
 

911 Crazy

FRF Supporting Member
Supporting Member
Joined
Jul 23, 2019
Posts
7,653
Reaction score
3,136
Location
Maine
I am totally amazed with those that have the patience/skill to do these type installs. Guess that's why there are professionals whom I can pay to do it right.....the first time! I remember my nightmare off road light install on my Toyota Celica in the 70's. Installed 4 across the front and 2 in the back. Worked an entire weekend and parts of 2 more with someone who supposedly knew what he was doing to get it right. That was it for me!
 

tractorman

Active Member
Joined
Feb 12, 2020
Posts
62
Reaction score
88
Location
California
I just installed my lightbar last night. Bought it from Nick at Apollo Optics. Good price, good communication, quick shipping. Isn't that what we all want? Kudos to Nick.

I will say the instructions lack detail. But with the information above it was easy. It is a little stressful pulling the headlight surrounds off for fear of busting something, but that went great. A couple of minutes later the grill was on the bench. It is that easy with the instructions above.

I installed the brackets and light, then bolted the inner grill back in with 2 top bolts and 2 bottom bolts, then put a bubble level on it and made the face plumb. I then took it outside in the dark and couldn't figure out if I wanted it up a little or down a little...so I suppose that means it was just right. I took out the 4 bolts, put the grill together, and partially installed it. Here is where I had a small problem. I was admiring my work when I noticed that the lightbar was slightly askew with the outer grill. What I figure out is the bolt holes in the outer grill have enough space to allow you to bolt the halves together just slightly "twisted". So I pulled the grill assembly out, loosened the bolts, and got it nice and straight. Then I examined how everything lined up (this time!) before I set the grill back in the hole.

I wired this to the #1 aux switch. I have the ground triggered by the high beam signal through a relay (that controls the ground only). Did this with my pocket lights also, except for the DOT fogs. This allows me to kick off my high beams and shut down all the big lights quickly.
 

Nick@Apollo-Optics

Supporting Vendor
Supporting Vendor
Joined
Apr 3, 2011
Posts
7,486
Reaction score
3,134
Location
Houston, TX
I just installed my lightbar last night. Bought it from Nick at Apollo Optics. Good price, good communication, quick shipping. Isn't that what we all want? Kudos to Nick.

I will say the instructions lack detail. But with the information above it was easy. It is a little stressful pulling the headlight surrounds off for fear of busting something, but that went great. A couple of minutes later the grill was on the bench. It is that easy with the instructions above.

I installed the brackets and light, then bolted the inner grill back in with 2 top bolts and 2 bottom bolts, then put a bubble level on it and made the face plumb. I then took it outside in the dark and couldn't figure out if I wanted it up a little or down a little...so I suppose that means it was just right. I took out the 4 bolts, put the grill together, and partially installed it. Here is where I had a small problem. I was admiring my work when I noticed that the lightbar was slightly askew with the outer grill. What I figure out is the bolt holes in the outer grill have enough space to allow you to bolt the halves together just slightly "twisted". So I pulled the grill assembly out, loosened the bolts, and got it nice and straight. Then I examined how everything lined up (this time!) before I set the grill back in the hole.

I wired this to the #1 aux switch. I have the ground triggered by the high beam signal through a relay (that controls the ground only). Did this with my pocket lights also, except for the DOT fogs. This allows me to kick off my high beams and shut down all the big lights quickly.

Sounds like a pretty trick install! Glad we could help get you setup, and thank you for the kind words!
 

bviperd

Active Member
Joined
Jan 9, 2020
Posts
59
Reaction score
29
Location
Long Beach, CA
I broke a few of the push pins on the top. Does anyone know where I can get an OEM replacement. Even the dealer didn't have any for me today while I was there.
 
Top