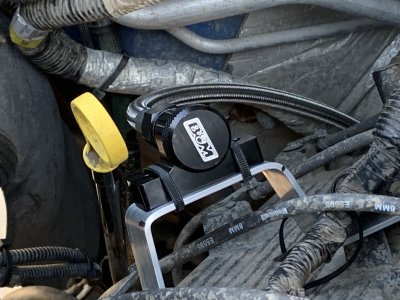
B&M Trans dipstick and larger pan

Disclaimer: Links on this page pointing to Amazon, eBay and other sites may include affiliate code. If you click them and make a purchase, we may earn a small commission.

Dane

FRF Addict
Joined
Sep 20, 2011
Posts
2,201
Reaction score
780
Location
Littleton, CO
Here in CO (where you are) the tranny temps were my first concern - I tow a toyhauler with a dry weight of about 5,600 - so easily in the 7K+ range depending on what's loaded, fluids, etc. The only times I would get high temps would be during nasty uphill tows where I was stuck going slow (traffic, no air flow). I went to the Saudi cooler and the AFE pan. Problem solved. My AFE has never leaked. I also used the AFE tranny port to install a separate tranny temperature gauge.
 

Augster

Active Member
Joined
Feb 14, 2016
Posts
69
Reaction score
51
Location
Sandy Eggo
Can you fill transmission through the B&M dipstick tube?

Yes, you can, albeit slowly. And prepare for many spills from filling too quickly. I jury rigged a nylon thread adapter to barb fitting, attached a hose to it and a funnel that reached out to the hood hinge and clamped it in place, which allowed me to fully fill the transmission after draining and installing new filter; slowly, but surely.

But for me, I have had an extremely difficult time properly reading the oil level on this dipstick as the oil seems to get dispersed all over it from sliding through the very narrow stainless steel hose. Some day I'm going to have to pull the end out of the pan and reinstall the factory disptick to get a proper reading.

If my readings with the factory dipstick show a proper level, then my fears would have been proven: the stainless steel hose is too small and interferes with the oil level on the dipstick, ergo, it's worthless as a real dipstick.

Is anyone else have the same issue with this dipstick, or is it just me?
 

Jakenbake

FRF Addict
Joined
Sep 20, 2017
Posts
1,792
Reaction score
2,454
Yes, you can, albeit slowly. And prepare for many spills from filling too quickly. I jury rigged a nylon thread adapter to barb fitting, attached a hose to it and a funnel that reached out to the hood hinge and clamped it in place, which allowed me to fully fill the transmission after draining and installing new filter; slowly, but surely.

But for me, I have had an extremely difficult time properly reading the oil level on this dipstick as the oil seems to get dispersed all over it from sliding through the very narrow stainless steel hose. Some day I'm going to have to pull the end out of the pan and reinstall the factory disptick to get a proper reading.

If my readings with the factory dipstick show a proper level, then my fears would have been proven: the stainless steel hose is too small and interferes with the oil level on the dipstick, ergo, it's worthless as a real dipstick.

Is anyone else have the same issue with this dipstick, or is it just me?


A couple questions:

Which route did you take for the dip stick? Around the side and over the exhaust or up between the back of the engine and the firewall?
How did you mark the dip stick? Did you create a zone with “cross hatching for the fluid to “stick” to or just a high and low line?
 

Augster

Active Member
Joined
Feb 14, 2016
Posts
69
Reaction score
51
Location
Sandy Eggo
A couple questions:

Which route did you take for the dip stick? Around the side and over the exhaust or up between the back of the engine and the firewall?

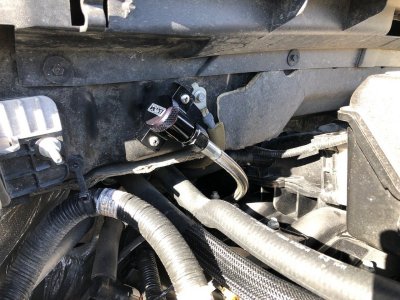
I followed the various video installs which had it going straight up the firewall behind the engine. Not sure if there's enough length and flexibility of the thick stainless steel hose to detour to the side around the exhaust, but if there is, I'd recommend that, or at least mounting the end aimed vertically as possible.

img_6256_e711455e3efeade78409642573245baa9c0da88d.jpg

Although canted at an angle does make pulling and inserting the dipstick much easier, filling it at an angle can lead to quite a few spills due to how slow it drains into the hose. Which is why I jury-rigged a nylon threaded insert-to-hose-barb adapter, a vinyl hose, and funnel to assist. It works really well when filling the transmission completely after a drain and filter change.


How did you mark the dip stick? Did you create a zone with “cross hatching for the fluid to “stick” to or just a high and low line?

While I had the pan and filter off, I dry fit the dipstick and it came down exactly the same distance as the original dipstick, and is of the same length, so I didn't bother notching the triangular tip as I know if the oil level is around mid-way, give or take a quarter inch, it's good. I do keep the original dipstick in the truck if I really wanted to measure to determine exactly how low/high the level may be from optimum.

The problem is trying to get an accurate reading as explained earlier: the thin inner hose messes with the oil on the tip and it appears to smear it beyond recognition of where the oil level actually resides. When I was filling it from dry, I just kept checking until I saw oil smeared all over.

But short of removing the hose and reinstalling the OEM dipstick to verify level, I'm not sure exactly where the level is at, other than I'm pretty sure it's not overfilled as I was always checking the level after each quart, and have checked it multiple times hot afterwards.

My recommendation for new installs is to check your OEM dipstick level FIRST, swap in the B&M, and check the new stick to get a base-line reading of how it would look on the tip.

I didn't do this because I wanted to physically measure where the B&M tip ends up with the pan removed. But now that I know the very end is placed exactly where the end of the OEM stick is, I've done this visual check for the rest of you so you can just swap yours in immediately.

Assuming that B&M manufacturing tolerances are stringent and adhered to (i.e. the stick and hose lengths are always the same), if you want to notch your dipstick, just lay it against the OEM stick with the ends lined up and mark away!
 
Last edited:

Jakenbake

FRF Addict
Joined
Sep 20, 2017
Posts
1,792
Reaction score
2,454
I followed the various video installs which had it going straight up the firewall behind the engine. Not sure if there's enough length and flexibility of the thick stainless steel hose to detour to the side around the exhaust, but if there is, I'd recommend that, or at least mounting the end aimed vertically as possible.

View attachment 153440

Although canted at an angle does make pulling and inserting the dipstick much easier, filling it at an angle can lead to quite a few spills due to how slow it drains into the hose. Which is why I jury-rigged a nylon threaded insert-to-hose-barb adapter, a vinyl hose, and funnel to assist. It works really well when filling the transmission completely after a drain and filter change.

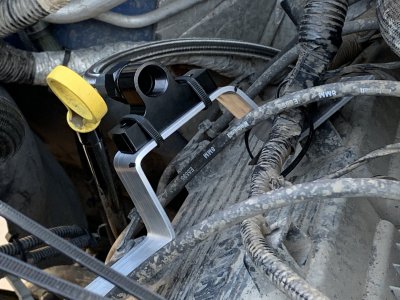
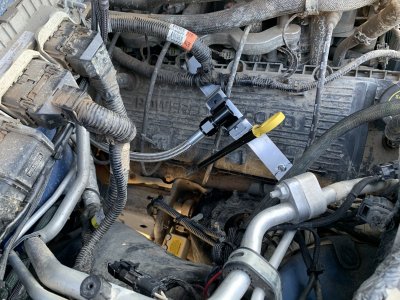
Either route will work if you mount to the cam cover. I am "fabricating" a mount to mount the fill tube/dipstick housing there. It provides a reasonably vertical fill hole as well.

Great idea on the nylon threaded/barb/hose/funnel!


While I had the pan and filter off, I dry fit the dipstick and it came down exactly the same distance as the original dipstick, and is of the same length, so I didn't bother notching the triangular tip as I know if the oil level is around mid-way, give or take a quarter inch, it's good. I do keep the original dipstick in the truck if I really wanted to measure to determine exactly how low/high the level may be from optimum.

The problem is trying to get an accurate reading as explained earlier: the thin inner hose messes with the oil on the tip and it appears to smear it beyond recognition of where the oil level actually resides. When I was filling it from dry, I just kept checking until I saw oil smeared all over.

But short of removing the hose and reinstalling the OEM dipstick to verify level, I'm not sure exactly where the level is at, other than I'm pretty sure it's not overfilled as I was always checking the level after each quart, and have checked it multiple times hot afterwards.

My recommendation for new installs is to check your OEM dipstick level FIRST, swap in the B&M, and check the new stick to get a base-line reading of how it would look on the tip.

I didn't do this because I wanted to physically measure where the B&M tip ends up with the pan removed. But now that I know the very end is placed exactly where the end of the OEM stick is, I've done this visual check for the rest of you so you can just swap yours in immediately.

Assuming that B&M manufacturing tolerances are stringent and adhered to (i.e. the stick and hose lengths are always the same), if you want to notch your dipstick, just lay it against the OEM stick with the ends lined up and mark away!

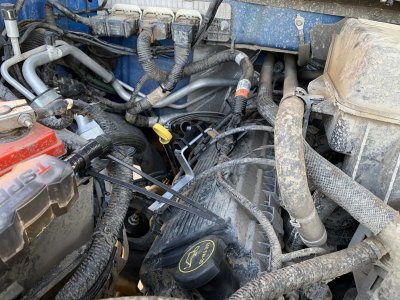
I was planning on getting the trans up to temp, marking the fill level line on the factory dipstick and then installing the new dipstick. Getting the trans back to the same temperature and marking the same line on the new dipstick. Then I will index the factory dipstick with the B&M one and transfer over the other marks. I also plan to make a crosshatch area to help the fluid stick to the dipstick end. Hopefully that will allow it to read better.

I do like your original idea though with removing the pan and comparing the two dipsticks level of protrusion into the pan though.


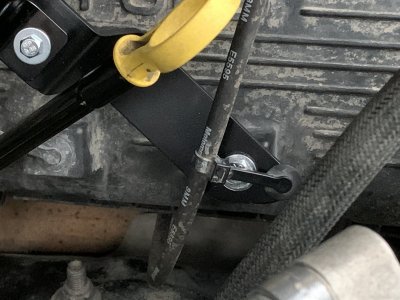
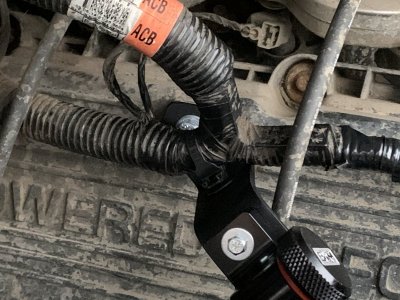
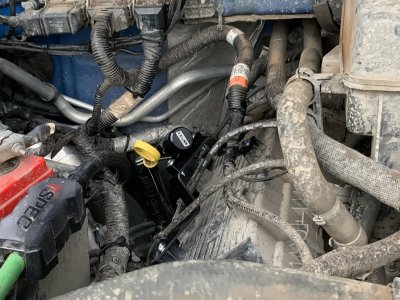
Here are a few pictures of the mount I am working on.
298E39B8-1692-461C-B1E9-E03FF31CF37D.jpeg 085D584F-62B4-476E-B044-1CCB1408DA66.jpeg E2254A6F-F77A-4823-A9A1-DC6A479E6ACF.jpeg CE6A54B8-E67A-4552-8A4F-A4417B869A4A.jpeg
 

Augster

Active Member
Joined
Feb 14, 2016
Posts
69
Reaction score
51
Location
Sandy Eggo
Great idea on the nylon threaded/barb/hose/funnel!

If I recall, I got the adapter at Home Depot in the faucet plumbing section! I'll see if I can get the part, or at least photos or thread specs.

Love the ingenuity! Puts the knob at the same area as the engine dipstick; nice!

I also plan to make a crosshatch area to help the fluid stick to the dipstick end. Hopefully that will allow it to read better.

Now why didn't I think of creating a rough surface to provide enough surface tension to keep the oil "reading" in place long enough...

How do you intend to create the hashmarks? The reason I didn't mark my tip in the first place was trying to figure out how to do it cleanly without *****'ing it. An engraver seems the best method, but I didn't want to invest in a tool for such a small job and that I don't foresee using it again in the future.
 
Last edited:

Jakenbake

FRF Addict
Joined
Sep 20, 2017
Posts
1,792
Reaction score
2,454
If I recall, I got the adapter at Home Depot in the faucet plumbing section! I'll see if I can get the part, or at least photos or thread specs.

Love the ingenuity! Puts the knob at the same area as the engine dipstick; nice!


Now why didn't I think of creating a rough surface to provide enough surface tension to keep the oil "reading" in place long enough...

How do you intend to create the hashmarks? The reason I didn't mark my tip in the first place was trying to figure out how to do it cleanly without *****'ing it. An engraver seems the best method, but I didn't want to invest in a tool for such a small job and that I don't foresee using it again in the future.

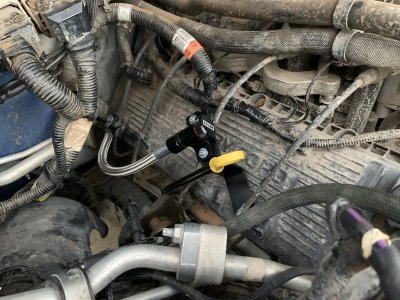
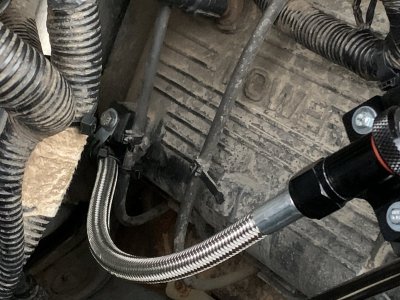
I think I am going to take a file and cut 3 lines representing the bottom of the “A” area, line between “A” and “B”, and the upper area of “B” from the factory dipstick. I’ll probably see how well the file works and then I’ll explore using a dremel and see where I get.
 

Jakenbake

FRF Addict
Joined
Sep 20, 2017
Posts
1,792
Reaction score
2,454
More or less finished up the install yesterday.

I recorded my fill level on my factory dipstick at 197* transmission temperature. Installed the new dipstick and got the transmission to 197* to get the same level on the new dipstick so I can index it off the factory one to transfer the marks over.

I couldn’t see a good fluid level on the new dipstick and it looked like it was all the way to the top of the dipstick. So I tried a new method to check the fluid. I don’t thread the cap in, just push it in until it bottoms out. This shifted the fluid level to the middle of the new dipstick. I can now read it pretty good without the marks on the dipstick. I will likely put the marks on the dipstick this afternoon to finish the install up.

4042ED32-E142-4653-BDBB-71DED12E61D7.jpeg

2A9FF2FD-5928-41BC-B518-C7E0F76BDE67.jpeg

C4F044B0-FD28-4A5D-9595-5B8B0E4AA285.jpeg

D39B487B-898B-47D6-B533-969D2CB264BA.jpeg

8DBA4FEC-8D72-4CB5-B4C2-5D46DFD68B93.jpeg
 
Top