MTF
FRF Addict
How to Install a Pop and Lock Automatic Tailgate Lock #PL8250 on a Ford F-150 Raptor
Click on Link to visit site: http://www.popandlock.net/index.php?p=product&id=82&parent=44
or Call: 1 800 342-5911
While I've never heard anybody having an issue to date, I thought I'd post the warranty disclaimer.
Please note that Pop & Lock™
Products purchased on auction sites such as Ebay, Amazon and Craig's List, etc. will not be covered under factory warranty under any circumstances.
Pop & Lock™ LLC (and Pop & Lock™ Corporation) is unable to verify whether products sold through auction sites are new, used, or refurbished,
therefore, Pop & Lock LLC (and Pop & Lock™ Corporation) is unable to warranty such purchases.
Pop & Lock LLC advises using extreme caution when purchasing our locks through auction sites as you'll be doing so at your own risk.
I gathered all the correct info in this thread and edited the first post to make it simple for everyboby to use.
Install time about 1 and 1/2 hours give or take.
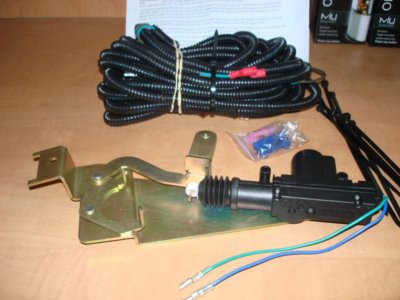
What you get with eveything you need to install.

Remove all Torx bolts and tailgate cover,
I removed the easy step handle as well just to make it simple. You can leave the handle and cover on and just lift the cover up.
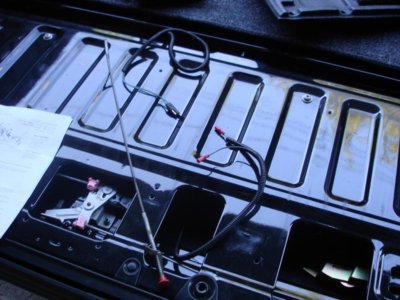
Run the short wires through the tailgate first before bolting on the lock.
Then remove the one nut on passenger side and put a big fat washer on it first to maintain correct height. (if needed, check to see if key is a little hard to turn)
Then slip the unit into the big opening two holes to the right and slide it over.
Make sure the two arms of the lock crank straddle the toggle link before you tighten the nut.
Then attach wires there isn't any correct way to wire it up at this point of the install, you can just reverse the two wires.
I chose to keep the some what blue wires continuous from actuator the the truck wires, this will make the lock and unlock work the correct way.

Run the wires to the Pasenger side you can leave the water proof plug connection in (or at) the tailgate,
there is more than enough cable to do the job even for the Super Crew!
I ran the wires through the frame rail to the gommet that is in the Rocker panel towards the rear of the doors.

Remove rocker panel cover by carefully lifting and poping up, no tools needed.
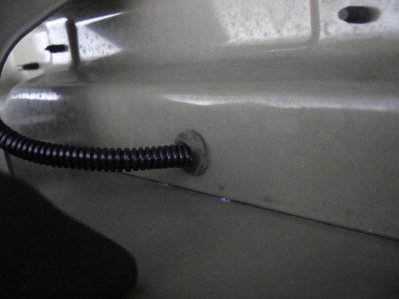
I then removed the gommet and I cut a small slit into the center of the grommet,
so all I had to do is squeeze it so a small hole appeared and then peel the loom back about 4 feet and then pulled the wires through it.
The grommet is soft and thick enough that it sealed around the wires there is no need to silicone.
Unless you go crazy with that small slit, I poke at it a little at a time.

I ran the wires through the factory tape in the channel to keep it nice and clean.
I attached the wires for my Super Cab Blue to Light Blue with Green stripe and Brown to Gray with Brown stripe just to keep it simple.
Don't worry I clean that up.

Please pay attention when reading the color codes so you do not get confused.
First,
I want to mention that more than a few members had success using the drivers side to tap into the wires
with newer year models, just as the instruction say.
Why, I can't say, it may have to do with the Trim codes, Year, Alarm and the way it was installed at the dealer, Remote start, etc.
So my suggestion is pop the sill caps off on both sides and see which side works for you before running the wires from the tailgate.
Or you may have a preference which side to use.
Lets begin:
Mr. dew.man said he had a pair of these colored wires in his Super Crew truck, and by trial and error he found the correct pair.
I could only find these two wires in my Super Cab truck in the passenger side.
There is someone who used the rear passenger door wires in a four door that member Vidiot found
(don't know where he found it because I would like to give him the credit)
Originally Posted by Thread I linked earlier
I just found out that if you wire up the Grey with Brown stripe and the Violet with Grey stripe
then the tailgate will open with the SECOND press of the button.
So it will open with all the passenger doors instead of with the drivers door.
This is for 2011 XLT Supercrew.
Members bL1X and KeithS both pointed out that in a SuperCrew Cab it is best to route the wires
up through the rear passenger side grommet to the front passenger side sill to attach the wires to the truck.
Big Green Machine states in a SuperCrew there is a gromment under the front kick panel that you can route the wires through.
Member permag on post #263 has found the correct wires for a 2014 Screw, grey/brown stripe wires, and to the violet/grey stripe wire.
and the wires are of the same gauge.
Now I will jump to the back.
Again trying to keep the some what blue wires continuous from the actuator to the truck wires.
When I plug the wires from the actuator to the wires from the front of the truck using the the plugs,
it worked in reverse the picture explains why.
Like I mention earlier you can swap the wires around at the actuator or rocker panel or one of the plugs.

The wiring to the plugs seems to have been corrected now with the new kits, from feedback I'm getting to this thread.
Since the wires are not attached right to the plugs and this is as far as I could get them together with out using needle nose pliers.
I just cut both plugs off and wired it correctly. I taped everything up and left enough loom to cover everything.
I had about five feet of slack with the wiring ,so I pulled up the slack back into the tailgate just in case I needed to take the tailgate off.
I will never take the tailgate off on purpose.
I also used some 3M foam tape and added it to both sides of the actuator to eliminate any rattling.
You can use any kind of foam that will stay in place or tie it up somehow.

And That's it.
Oh, and while your down there under the spare take a look at your Trailer Hookup,
Ford did a crappy job at taping where the wires go into the plug it was full of dirt,
I cleaned it out and used about a half a roll of tape covering up the little release tab as well.
PS. I want to point out that when I upgraded my alarm so I could use it for the Pace Edwards Remote Control Electric BedLocker cover,
from the Standard Ford Factory 4 button Alarm to the Ford Factory Gold 6 button Alarm,
they installed it correctly but they setup the alarm incorrectly at the dealer,
that is why there are so many post in this thread.
There will be no problems with your truck and Pop and Lock.
Thanks for all the input in making this a useful post.
Click on Link to visit site: http://www.popandlock.net/index.php?p=product&id=82&parent=44
or Call: 1 800 342-5911
While I've never heard anybody having an issue to date, I thought I'd post the warranty disclaimer.
Please note that Pop & Lock™
Products purchased on auction sites such as Ebay, Amazon and Craig's List, etc. will not be covered under factory warranty under any circumstances.
Pop & Lock™ LLC (and Pop & Lock™ Corporation) is unable to verify whether products sold through auction sites are new, used, or refurbished,
therefore, Pop & Lock LLC (and Pop & Lock™ Corporation) is unable to warranty such purchases.
Pop & Lock LLC advises using extreme caution when purchasing our locks through auction sites as you'll be doing so at your own risk.
I gathered all the correct info in this thread and edited the first post to make it simple for everyboby to use.
Install time about 1 and 1/2 hours give or take.
What you get with eveything you need to install.

Remove all Torx bolts and tailgate cover,
I removed the easy step handle as well just to make it simple. You can leave the handle and cover on and just lift the cover up.
Run the short wires through the tailgate first before bolting on the lock.
Then remove the one nut on passenger side and put a big fat washer on it first to maintain correct height. (if needed, check to see if key is a little hard to turn)
Then slip the unit into the big opening two holes to the right and slide it over.
Make sure the two arms of the lock crank straddle the toggle link before you tighten the nut.
Then attach wires there isn't any correct way to wire it up at this point of the install, you can just reverse the two wires.
I chose to keep the some what blue wires continuous from actuator the the truck wires, this will make the lock and unlock work the correct way.

Run the wires to the Pasenger side you can leave the water proof plug connection in (or at) the tailgate,
there is more than enough cable to do the job even for the Super Crew!
I ran the wires through the frame rail to the gommet that is in the Rocker panel towards the rear of the doors.

Remove rocker panel cover by carefully lifting and poping up, no tools needed.
I then removed the gommet and I cut a small slit into the center of the grommet,
so all I had to do is squeeze it so a small hole appeared and then peel the loom back about 4 feet and then pulled the wires through it.
The grommet is soft and thick enough that it sealed around the wires there is no need to silicone.
Unless you go crazy with that small slit, I poke at it a little at a time.
I ran the wires through the factory tape in the channel to keep it nice and clean.
I attached the wires for my Super Cab Blue to Light Blue with Green stripe and Brown to Gray with Brown stripe just to keep it simple.
Don't worry I clean that up.
Please pay attention when reading the color codes so you do not get confused.
First,
I want to mention that more than a few members had success using the drivers side to tap into the wires
with newer year models, just as the instruction say.
Why, I can't say, it may have to do with the Trim codes, Year, Alarm and the way it was installed at the dealer, Remote start, etc.
So my suggestion is pop the sill caps off on both sides and see which side works for you before running the wires from the tailgate.
Or you may have a preference which side to use.
Lets begin:
Mr. dew.man said he had a pair of these colored wires in his Super Crew truck, and by trial and error he found the correct pair.
I could only find these two wires in my Super Cab truck in the passenger side.
There is someone who used the rear passenger door wires in a four door that member Vidiot found
(don't know where he found it because I would like to give him the credit)
Originally Posted by Thread I linked earlier
I just found out that if you wire up the Grey with Brown stripe and the Violet with Grey stripe
then the tailgate will open with the SECOND press of the button.
So it will open with all the passenger doors instead of with the drivers door.
This is for 2011 XLT Supercrew.
Members bL1X and KeithS both pointed out that in a SuperCrew Cab it is best to route the wires
up through the rear passenger side grommet to the front passenger side sill to attach the wires to the truck.
Big Green Machine states in a SuperCrew there is a gromment under the front kick panel that you can route the wires through.
Member permag on post #263 has found the correct wires for a 2014 Screw, grey/brown stripe wires, and to the violet/grey stripe wire.
and the wires are of the same gauge.
Now I will jump to the back.
Again trying to keep the some what blue wires continuous from the actuator to the truck wires.
When I plug the wires from the actuator to the wires from the front of the truck using the the plugs,
it worked in reverse the picture explains why.
Like I mention earlier you can swap the wires around at the actuator or rocker panel or one of the plugs.
The wiring to the plugs seems to have been corrected now with the new kits, from feedback I'm getting to this thread.
Since the wires are not attached right to the plugs and this is as far as I could get them together with out using needle nose pliers.
I just cut both plugs off and wired it correctly. I taped everything up and left enough loom to cover everything.
I had about five feet of slack with the wiring ,so I pulled up the slack back into the tailgate just in case I needed to take the tailgate off.
I will never take the tailgate off on purpose.
I also used some 3M foam tape and added it to both sides of the actuator to eliminate any rattling.
You can use any kind of foam that will stay in place or tie it up somehow.

And That's it.
Oh, and while your down there under the spare take a look at your Trailer Hookup,
Ford did a crappy job at taping where the wires go into the plug it was full of dirt,
I cleaned it out and used about a half a roll of tape covering up the little release tab as well.
PS. I want to point out that when I upgraded my alarm so I could use it for the Pace Edwards Remote Control Electric BedLocker cover,
from the Standard Ford Factory 4 button Alarm to the Ford Factory Gold 6 button Alarm,
they installed it correctly but they setup the alarm incorrectly at the dealer,
that is why there are so many post in this thread.
There will be no problems with your truck and Pop and Lock.
Thanks for all the input in making this a useful post.
Last edited:

