bigrig
Full Access Member
Summary
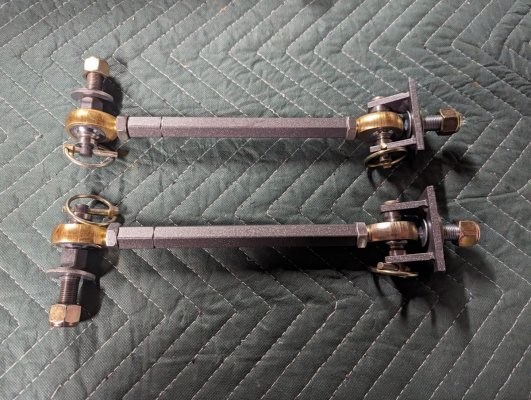
I made a quick release sway bar link for a Gen1 Raptor. This project spanned over three months and involved a bit of trial and error. The following story will provide a detailed account of the process I went through and the information I gained along the way.
Full Story
The convenience of a quickly detachable sway bar link is something I value. An engaged sway bar improves on-road handling, while disengaging it during off-roading allows for more articulation of the front suspension. Some folks have told me I should remove the sway bar altogether but I tried driving the truck with the sway bar link disconnected for about a year and found that I prefer having it for on-road driving. This is what started my saga of searching for a good quick-release sway bar link.I first tried a sway bar link offered by Forged Offroad (no longer available). It worked ok, but was very hard to remove despite being a quick release link. The link ended up breaking a year or so into its life and I went back to the OEM links.
Then I found an offering from GJ motorsports. Initially, I believed it would be the ideal solution, so I made a purchase despite the ungodly price of $300 per link. I figured it would be the last sway bar link I would ever have to buy though. However, two and a half months later, Phil from GJ informed me that the link supplier was encountering challenges with the anodizing process. I ultimately ended up canceling my order. It has now been a year since that conversation, and the website still lists the sway bar links as "pre-order." If you intend to buy one of these links, you should be prepared for a potentially extended (indefinite?) wait. Once I abandoned my order and decided to take on the project myself.
Initially, I based my design on the GJ sway bar link. I assumed it would be a straightforward task to gather all the necessary parts from McMaster, assemble them, and be on my way. I anticipated wasting a little money determining the correct size of the turnbuckle, but it couldn’t cost more than $300, right?
I quickly encountered challenges when searching for parts on McMaster. For instance, the top clevis on the GJ link (which I learned was called a birdcage clevis), was not available. Additionally, the clevis options they provided were unsuitable for my application. I explored options on eBay but could not find suitable variants that would fit the rod ends with misalignment spacers available from McMaster. Furthermore, the turnbuckles offered by McMaster were either too long or too short, and the holes in the clevis pins they sold did not match the size of the lynch pins I intended to use. Another obstacle I encountered was the LCA mounting point. I mocked it out by welding a bolt to a nut to a clevis pin. From there I tried to find something that I could put together from the parts store that would match. No luck there either.
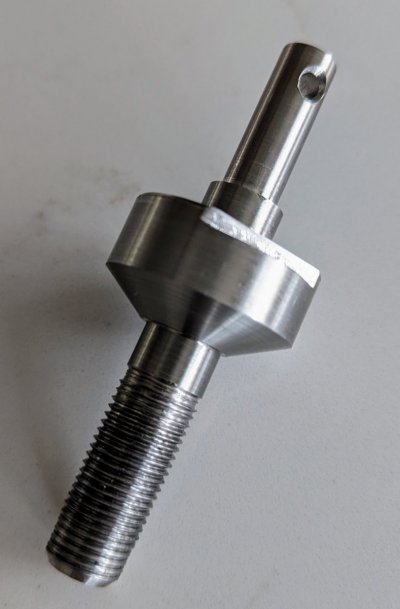
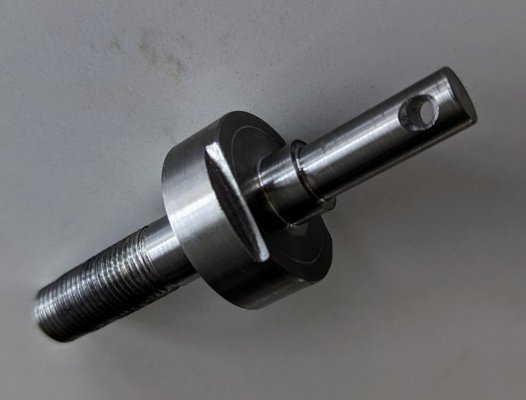
It was then I took to the garage and started working out a plan to make my own components. Armed with a welder, a drill press, and a tap and die set I got to work. I managed to create a bit of scrap metal before realizing that what my garage has been missing for quite some time is a lathe. (What they tell you about cheap imported lathes is correct; you spend a little money on them at first, then you spend a ton of time and a bit more money to get them so they work correctly.) After a couple weeks sorting out the lathe I was able to produce a sway bar link that I have been using for the past few months.
I employed the first rule of government spending, why build one when you could build two for twice the price. For a while, I developed a hobby of fine-tuning various aspects of the design. I justified my efforts by claiming that I was making these as Christmas gifts for friends with Raptors. While I considered trying to offset the costs I incurred in this process by selling the links to interested buyers, I doubt it would be financially viable, considering the significant time required to complete each set.
So instead, I authored this document that shows how to make one of these sweet-sweet quick release sway bar links yourself, if you are so inclined, and a picture album of the progress progress since… pics or it didn’t happen
You made it this far? Yeah, you are a Raptor fanatic... well done.
Last edited:


