- Joined
- Dec 16, 2016
- Posts
- 18,214
- Reaction score
- 28,643
So if you have seen Guy’s post on updating the Raptor 802A speakers, here’s a how to with some pictures on replacing the rear door speakers.
Here’s Guy’s post on the parts, etc. http://www.fordraptorforum.com/f266/diy-stereo-upgrade-under-$500-00-a-53213/
let’s get to it, shall we?
First off, check your parts, make sure you have at least the speakers, adapter plates, harness adapters and some plastic trim removal tools. You can use plastic putty knives if need be, but metal will definitely screw up the paint in some places.
NOTE: The adapter plates contain ‘hardware’ (screws) to affix the speakers to the adapter plates, but those screws don’t fit ! You’ll need 8 screws to make this upgrade. I don’t say what kind because I did what any self respecting red neck would do - I chopped some drywall screws and used them.
Finally, at the end of this upgrade, you should have no more than 3 leftover parts and two of them should be the speakers you took out. Just sayin’
Next, you’ll need a 9/32” socket and extension.
There are 2 screws on the bottom of the door trim panel. You might as well start there. I tried several times to get a picture, did not succeed.
The step is really self explanatory.
Next, you need to pop the trim panel off the rear door handle.
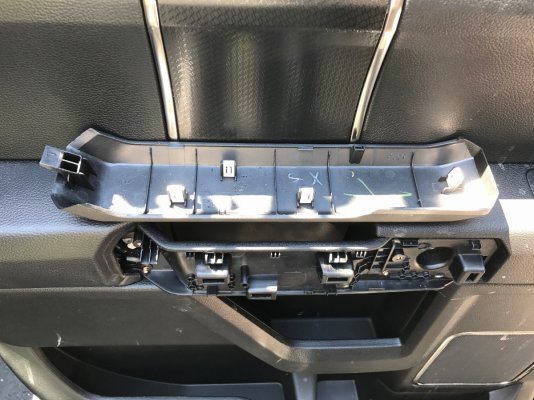
this is the driver’s door. Note the location of the ‘tab’ on the rear of the trim piece. This tab is on the rear of both rear door trim pieces. Use the plastic trim poppers starting at the front or middle and pop out the clips from front to middle and the trim piece will pop right off.
So here is the passenger door to illustrate:
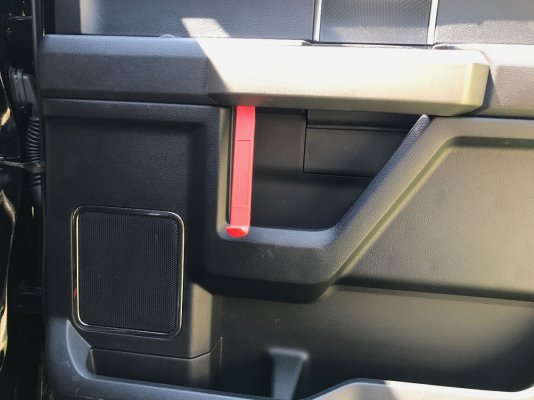
Next we have a trim piece under the door handle.
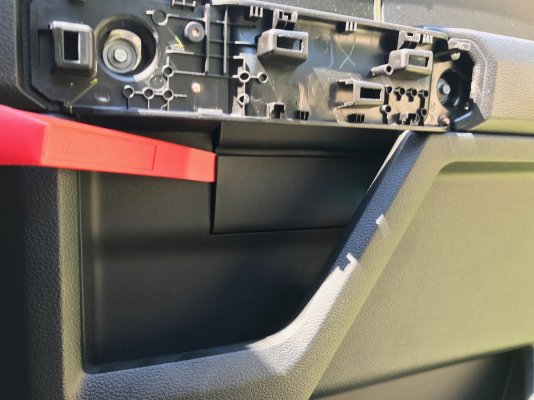
This trim piece has tabs on the bottom, so only pry from the top part of the trim on either door.
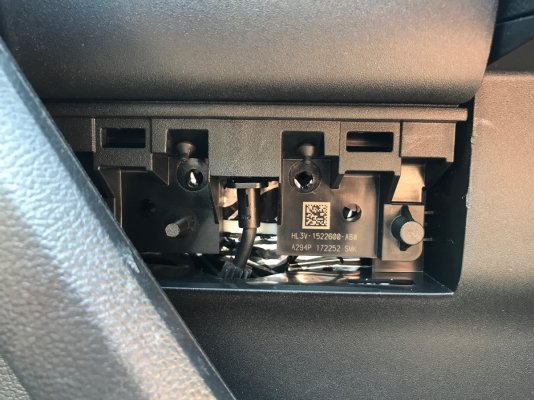
Now once you pop that trim piece out, the following will be revealed, minus the dynamat and with the addition of 2 more screws.
So now, you have removed the door handle and whatever that trim panel is called and you’ve exposed 4 screws that are serendipitously the same size as the 2 you removed from the bottom of the door trim. Remove all 4 of the screws and keep them organized as each pair is a different type / size.
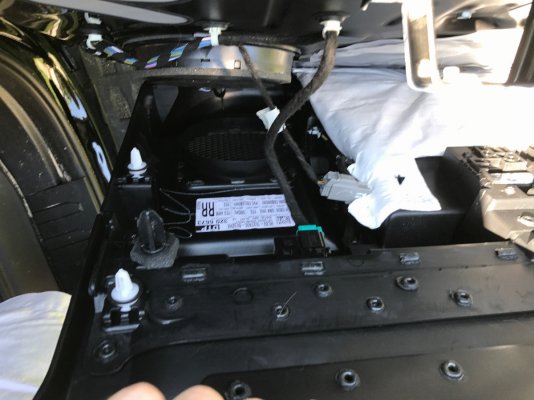
Now, all of the remaining fasteners are tension clips. Use your handy trim removal tools and pry the trim starting at the bottom / front / back of the trim and working your way up. Pry the trim removal tool into the gap between the trim and door, brace the door with your knee and pull the trim sharply to pop the clips loose. When you get to the top, pop the trim out and up and it will be free. Now you have 2 wire harnesses, the speaker harness and the door lock cable. It should look something like this:
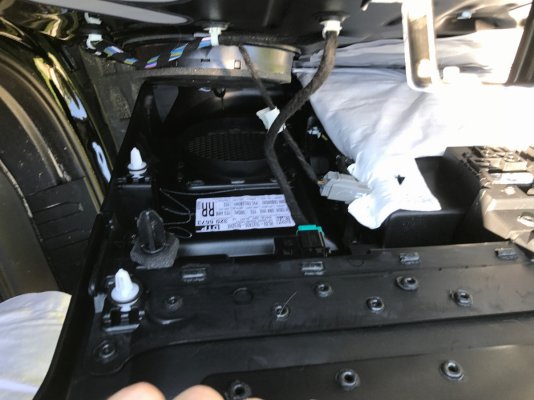
The harnesses all pop loose with one hand. Maybe there’s a simple way to remove the door handle cable, I didn’t find it fast enough and worked with the trim either propped on the door, or suspended with zip ties to work on the bottom.
Now, your trim is loose and you have access to the speaker. Fortuitously, that same 9/32 socket you used to remove the door trim also works on the 3 door speaker screws. Remove the speaker screws, don’t panic, when you pull the 3rd screw it won’t fall. There are 2 plastic clips holding the factory speaker in place. Pull / pry the speaker loose and set it aside.
If you are going to Dynamat the doors, now is the time. Take your time and be mindful that some Ford Mechanic, or you, might need access the screws you’re thinking you can just cover over sometime down the road. also be mindful not to blindly cover the trim holes. This can be time consuming, and isn’t required, but Dynamat does help with some audio quality.
Now, obtain your replacement speaker, metra harness and adapter plate. You can either modify the stock speaker plate ( sacrifices the old speaker ) or use a dedicated part to affix the aftermarket speaker. I prefer the latter in case something goes south. Now, the adapter plate to mount the rear 6.5” speaker is missing one key feature: A pass through for the speaker wires. The Metra harness connects to the factory harness, and has 2 connectors for the speaker that can only fit (properly) one way. There’s a big and small connector. However, there’s no accommodation for the wires.
Use a drill and 3/8” drill bit. You will probably want to drill near the bottom of the adapter plate, slightly offset from “6 o’clock”. Once drilled, stick the fat connector through first, then the skinny one.
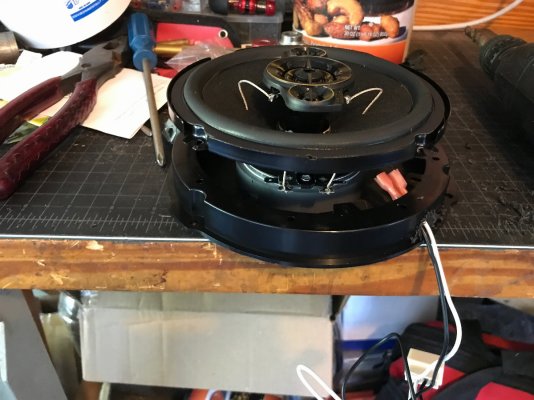
I spent more time typing the description than I did on the actual deed. Don’t overthink this part.
Now you are ready to mount the speaker and connect it.
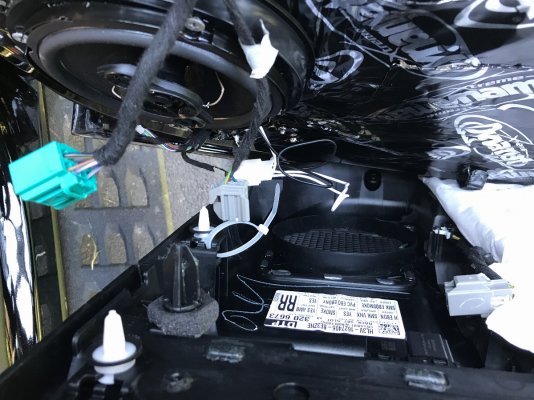
Smoke test. (seriously, make sure you have sound from the replacement when the replacement is effected, but before you button everything up).
Now, it’s time to reassemble.
It’s basically reverse order.
Reconnect your harnesses. Ensure they snap into place.
Now, orient and hang your trim piece on the door. Be mindful of the front and rear weather stripping, and the door lock. Once the top is oriented properly, snap one of the mid level clips into place. Eyeball your Dynamat work, if any. If you took it right to the edge of the trim, you might need to do some trimming of the Dynamat. Else, continue reassembling. Basically pop the trim piece back into place at each connector. Once you have this done, maybe check the power locks, window, speaker(again) and if you’re satisfied with your work, reassemble the screws / bolts into the door.
For the under handle trim piece, put the screws in and re-tighten them. feed the slots of the trim piece into the bottom of the door trim and pop the trim into place.
Tighten the screws in the door handle.
Slide the door handle tab into the rear of the door handle assembly in the door trim and pop the trim into place.
By far the most frustrating part of this was putting the 2 rear door screws back in the bottom of the door trim. A good light will help you align the screws with the plastic trim brackets. Take your time and it will go fine.
That’s it. The speaker replacement took maybe 75 minutes per door, if that. The Dynamat adds a few hours on top of this depending on how thoroughly you measure and cut the dynamat. Clean up your tools, save any leftover parts.
Here’s Guy’s post on the parts, etc. http://www.fordraptorforum.com/f266/diy-stereo-upgrade-under-$500-00-a-53213/
let’s get to it, shall we?
First off, check your parts, make sure you have at least the speakers, adapter plates, harness adapters and some plastic trim removal tools. You can use plastic putty knives if need be, but metal will definitely screw up the paint in some places.
NOTE: The adapter plates contain ‘hardware’ (screws) to affix the speakers to the adapter plates, but those screws don’t fit ! You’ll need 8 screws to make this upgrade. I don’t say what kind because I did what any self respecting red neck would do - I chopped some drywall screws and used them.

Finally, at the end of this upgrade, you should have no more than 3 leftover parts and two of them should be the speakers you took out. Just sayin’
Next, you’ll need a 9/32” socket and extension.
There are 2 screws on the bottom of the door trim panel. You might as well start there. I tried several times to get a picture, did not succeed.
The step is really self explanatory.
Next, you need to pop the trim panel off the rear door handle.

this is the driver’s door. Note the location of the ‘tab’ on the rear of the trim piece. This tab is on the rear of both rear door trim pieces. Use the plastic trim poppers starting at the front or middle and pop out the clips from front to middle and the trim piece will pop right off.
So here is the passenger door to illustrate:

Next we have a trim piece under the door handle.

This trim piece has tabs on the bottom, so only pry from the top part of the trim on either door.
Now once you pop that trim piece out, the following will be revealed, minus the dynamat and with the addition of 2 more screws.
So now, you have removed the door handle and whatever that trim panel is called and you’ve exposed 4 screws that are serendipitously the same size as the 2 you removed from the bottom of the door trim. Remove all 4 of the screws and keep them organized as each pair is a different type / size.

Now, all of the remaining fasteners are tension clips. Use your handy trim removal tools and pry the trim starting at the bottom / front / back of the trim and working your way up. Pry the trim removal tool into the gap between the trim and door, brace the door with your knee and pull the trim sharply to pop the clips loose. When you get to the top, pop the trim out and up and it will be free. Now you have 2 wire harnesses, the speaker harness and the door lock cable. It should look something like this:

The harnesses all pop loose with one hand. Maybe there’s a simple way to remove the door handle cable, I didn’t find it fast enough and worked with the trim either propped on the door, or suspended with zip ties to work on the bottom.
Now, your trim is loose and you have access to the speaker. Fortuitously, that same 9/32 socket you used to remove the door trim also works on the 3 door speaker screws. Remove the speaker screws, don’t panic, when you pull the 3rd screw it won’t fall. There are 2 plastic clips holding the factory speaker in place. Pull / pry the speaker loose and set it aside.
If you are going to Dynamat the doors, now is the time. Take your time and be mindful that some Ford Mechanic, or you, might need access the screws you’re thinking you can just cover over sometime down the road. also be mindful not to blindly cover the trim holes. This can be time consuming, and isn’t required, but Dynamat does help with some audio quality.
Now, obtain your replacement speaker, metra harness and adapter plate. You can either modify the stock speaker plate ( sacrifices the old speaker ) or use a dedicated part to affix the aftermarket speaker. I prefer the latter in case something goes south. Now, the adapter plate to mount the rear 6.5” speaker is missing one key feature: A pass through for the speaker wires. The Metra harness connects to the factory harness, and has 2 connectors for the speaker that can only fit (properly) one way. There’s a big and small connector. However, there’s no accommodation for the wires.
Use a drill and 3/8” drill bit. You will probably want to drill near the bottom of the adapter plate, slightly offset from “6 o’clock”. Once drilled, stick the fat connector through first, then the skinny one.

I spent more time typing the description than I did on the actual deed. Don’t overthink this part.
Now you are ready to mount the speaker and connect it.

Smoke test. (seriously, make sure you have sound from the replacement when the replacement is effected, but before you button everything up).
Now, it’s time to reassemble.
It’s basically reverse order.
Reconnect your harnesses. Ensure they snap into place.
Now, orient and hang your trim piece on the door. Be mindful of the front and rear weather stripping, and the door lock. Once the top is oriented properly, snap one of the mid level clips into place. Eyeball your Dynamat work, if any. If you took it right to the edge of the trim, you might need to do some trimming of the Dynamat. Else, continue reassembling. Basically pop the trim piece back into place at each connector. Once you have this done, maybe check the power locks, window, speaker(again) and if you’re satisfied with your work, reassemble the screws / bolts into the door.
For the under handle trim piece, put the screws in and re-tighten them. feed the slots of the trim piece into the bottom of the door trim and pop the trim into place.
Tighten the screws in the door handle.
Slide the door handle tab into the rear of the door handle assembly in the door trim and pop the trim into place.
By far the most frustrating part of this was putting the 2 rear door screws back in the bottom of the door trim. A good light will help you align the screws with the plastic trim brackets. Take your time and it will go fine.
That’s it. The speaker replacement took maybe 75 minutes per door, if that. The Dynamat adds a few hours on top of this depending on how thoroughly you measure and cut the dynamat. Clean up your tools, save any leftover parts.


