bigrig
Full Access Member
Geiser Brothers Progressive Coil Installation
Tools I used
Torque Specs
About my experience with Geiser Brothers
I learned of these coils through a FordRaptorForum post and requested a set. Qcfx2 quickly responded to me, and told me how to place an order. The springs arrived within the same week. Outstanding service.
Removal of the old coils
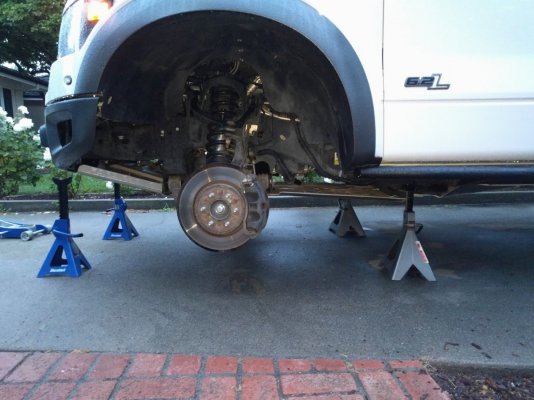
Jack the front of the truck up high enough to remove the wheels and place jackstands under the frame in the front. Use the rust penetrant on the threads for the removal of the three upper shock mount nuts, tie rod end nut, lower shock nut, and upper control arm ball joint nut.
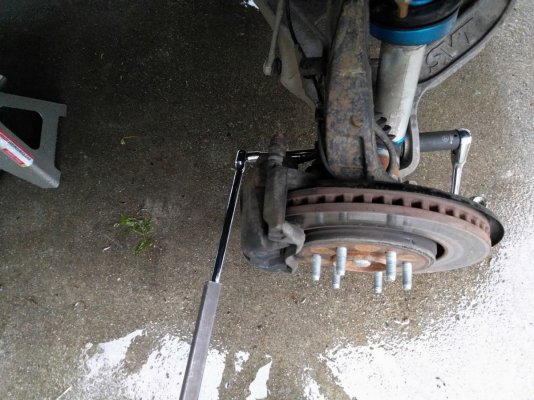
Loosen bottom shock bolt. Get ready to use those muscles and a cheater bar or two to get this off. I didn’t have too much trouble getting it loose but I can imagine older trucks with a bit of rust buildup would have a harder time. The nut can be reached by a 30mm deep socket with an extension. The bolt head is 27mm. The nut can be removed but leave the bolt in for now.
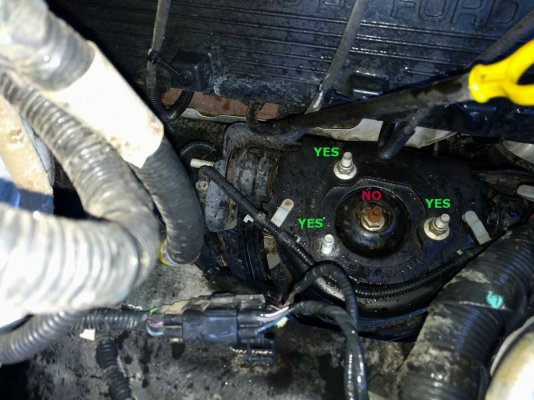
Loosen the top three upper shock mount nuts. Depending on the side you are working on and which bolt you are loosening, the approach can vary. I used a 15mm box end wrench to remove some of the nuts and an impact wrench with an extension, flex adapter and a 15mm deep socket to remove others. I should mention that I popped the brake lines out of their harness to gain better access to the back nut on the drivers side.
WARNING: Do not remove the middle nut. That is the shock rod nut should not be removed at this time. It is under the extreme pressure of the coil and it would be dangerous to remove it at this point.
NOTE: It is important to note the orientation of the bolts sticking out of the top of the shock in relation to the position of the bottom of the shock. When replacing the coil you will want to recreate the same orientation.
Loosen the tie rod end nut with a 21mm deep socket and impact wrench. After the nut is removed hit the steering knuckle where the tie rod end attaches to it with a 3lb sledge. A few impacts should be enough to have it pop apart.
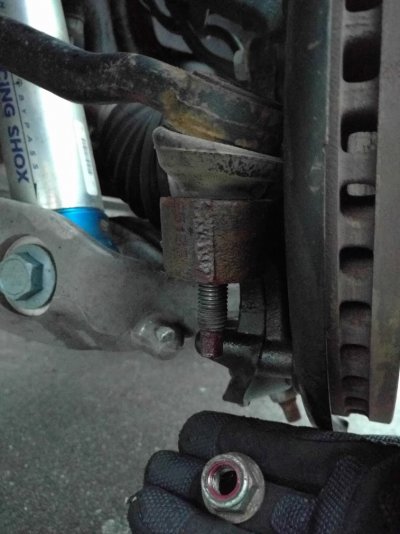
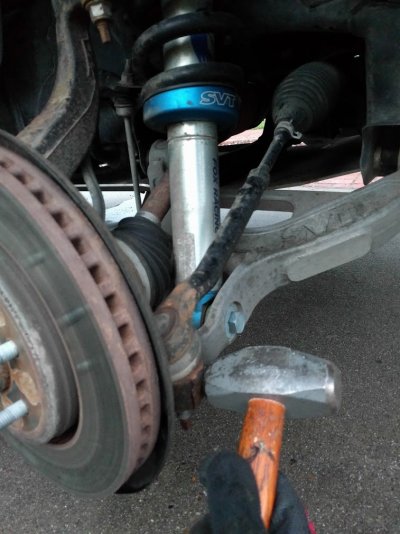
Loosen the upper control arm ball joint nut with a 21mm deep socket and impact wrench. Do not remove the nut all the way. Leave it so it is sitting on the end of the ball joint. Approach this the same way as you did with the tie rod end; hit it with a 3lb sledge and it should pop apart, but it won’t separate all the way since the nut that was left there will hold it in place.
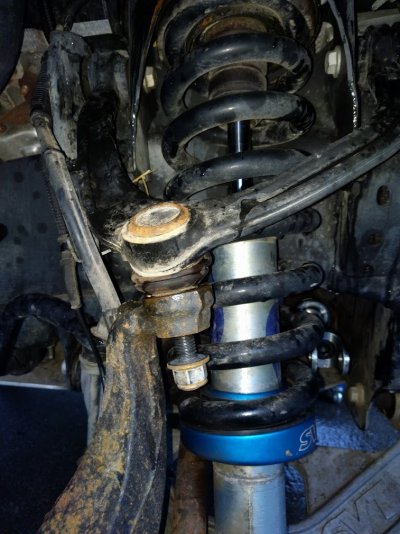
Make sure there is no tension on the shock (the upper and lower control arm should be fully extended downward). Remove bottom shock bolt.
Carefully loosen the upper control arm nut while supporting the steering knuckle. It is important to take care here, once the upper control arm is freed from the steering knuckle, the brake lines and other hoses can get stretched pretty severely without support. Have a partner to lend a hand, or strategically use a jack or some cargo straps to support the steering knuckle so it doesn’t damage the brake lines. The lower control arm should have some flex and you should be able to push it down enough to pop out the shock completely.
Before I started this project I decided to buy a "heavy duty" hydraulic coil compressor. Let me save you all the $130 that it cost me. This tool was not made for our trucks, the shock didn’t fit in it so I modified it a bit, and the results were less than impressive. I ended up taking the shock over to a DIY garage near me called Pit Row. They had a coil compressor that made the job a breeze.
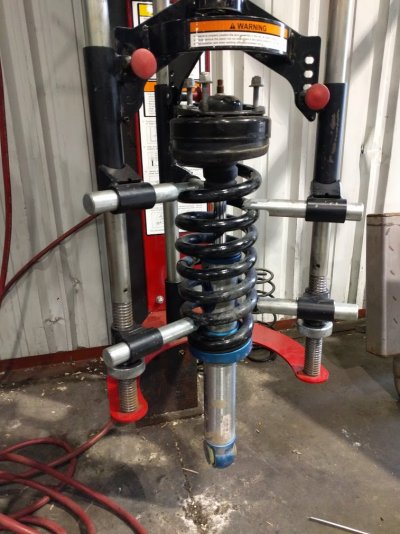
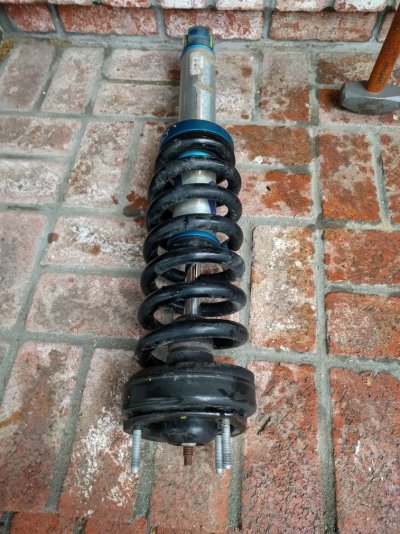
Once compressed you can loosen and remove the center nut attached to the shock rod with a 17mm box end wrench. You may have to use a 9mm box end wrench to hold the shock rod in place. Remove the shock from the coil and the coil from the compressor. Compress the new Geiser Brothers spring in the compressor and mount the shock in the same orientation to the top it was before you removed it. The picture below gives you a reference to how the bolts should line up with the bottom of the shock. Getting this right will make it easier to install the shock.
Installation of the new coils
Putting everything back together is just inverting all the previous steps.
Final Thoughts
This wasn’t an extremely tough project, but having the right tools is a necessity. It took me a weekend to get this and a tie rod upgrade completed. In hindsight, I would recommend doing it on a weekend when it wasn’t raining.
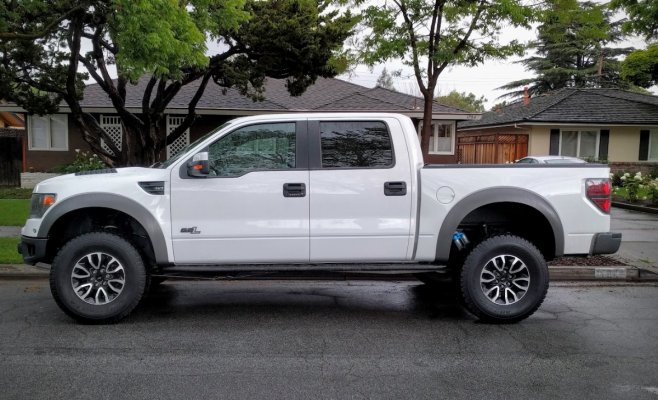
After reading the reviews, I expected the coils would lift the front end up a bit more than they did. I didn’t see much change however, maybe an inch at most. I am getting an alignment tomorrow and should have more information on the drivability of the springs soon.
Good luck on your install! Measure twice, cut once, have fun, enjoy the process!
~bigrig
Tools I used
- 30mm deep impact socket
- 27mm socket
- 21mm deep impact socket
- 15mm deep impact socket
- 15mm box end wrench
- Impact wrench
- 3lb sledge hammer
- Socket extension
- Cheater/breaker bar
- 2 Socket wrench
- Jack
- 2 jackstands
- Torque wrench
- Blue Loctite
- Rust penetrant
- Torque spec sheet
Torque Specs
- Lower Shock Nut: 406 ft/lbs
- Upper shock mount nuts: 30 ft/lbs
- Shock rod nut: 41 ft/lbs
- Tie rod end nut: 85 ft/lbs
- Upper control arm ball joint: 85 ft/lbs
About my experience with Geiser Brothers
I learned of these coils through a FordRaptorForum post and requested a set. Qcfx2 quickly responded to me, and told me how to place an order. The springs arrived within the same week. Outstanding service.
Removal of the old coils
Jack the front of the truck up high enough to remove the wheels and place jackstands under the frame in the front. Use the rust penetrant on the threads for the removal of the three upper shock mount nuts, tie rod end nut, lower shock nut, and upper control arm ball joint nut.

Loosen bottom shock bolt. Get ready to use those muscles and a cheater bar or two to get this off. I didn’t have too much trouble getting it loose but I can imagine older trucks with a bit of rust buildup would have a harder time. The nut can be reached by a 30mm deep socket with an extension. The bolt head is 27mm. The nut can be removed but leave the bolt in for now.

Loosen the top three upper shock mount nuts. Depending on the side you are working on and which bolt you are loosening, the approach can vary. I used a 15mm box end wrench to remove some of the nuts and an impact wrench with an extension, flex adapter and a 15mm deep socket to remove others. I should mention that I popped the brake lines out of their harness to gain better access to the back nut on the drivers side.
WARNING: Do not remove the middle nut. That is the shock rod nut should not be removed at this time. It is under the extreme pressure of the coil and it would be dangerous to remove it at this point.
NOTE: It is important to note the orientation of the bolts sticking out of the top of the shock in relation to the position of the bottom of the shock. When replacing the coil you will want to recreate the same orientation.

Loosen the tie rod end nut with a 21mm deep socket and impact wrench. After the nut is removed hit the steering knuckle where the tie rod end attaches to it with a 3lb sledge. A few impacts should be enough to have it pop apart.


Loosen the upper control arm ball joint nut with a 21mm deep socket and impact wrench. Do not remove the nut all the way. Leave it so it is sitting on the end of the ball joint. Approach this the same way as you did with the tie rod end; hit it with a 3lb sledge and it should pop apart, but it won’t separate all the way since the nut that was left there will hold it in place.

Make sure there is no tension on the shock (the upper and lower control arm should be fully extended downward). Remove bottom shock bolt.
Carefully loosen the upper control arm nut while supporting the steering knuckle. It is important to take care here, once the upper control arm is freed from the steering knuckle, the brake lines and other hoses can get stretched pretty severely without support. Have a partner to lend a hand, or strategically use a jack or some cargo straps to support the steering knuckle so it doesn’t damage the brake lines. The lower control arm should have some flex and you should be able to push it down enough to pop out the shock completely.
Before I started this project I decided to buy a "heavy duty" hydraulic coil compressor. Let me save you all the $130 that it cost me. This tool was not made for our trucks, the shock didn’t fit in it so I modified it a bit, and the results were less than impressive. I ended up taking the shock over to a DIY garage near me called Pit Row. They had a coil compressor that made the job a breeze.

Once compressed you can loosen and remove the center nut attached to the shock rod with a 17mm box end wrench. You may have to use a 9mm box end wrench to hold the shock rod in place. Remove the shock from the coil and the coil from the compressor. Compress the new Geiser Brothers spring in the compressor and mount the shock in the same orientation to the top it was before you removed it. The picture below gives you a reference to how the bolts should line up with the bottom of the shock. Getting this right will make it easier to install the shock.

Installation of the new coils
Putting everything back together is just inverting all the previous steps.
- Replace shock
- Insert lower shock bolt (not the nut yet)
- Reconnect upper control arm ball joint. 85 ft/lbs, 21mm, use Blue Loctite if not replacing nut.
- Jack up lower control arm so the shock has the regular full weight of the vehicle on it.
- Tighten upper shock mount nuts. Don’t forget the spacer that goes between the nuts and the top of the shock housing. 15mm, 30 ft/lbs use Blue Loctite if not replacing nut.
- Tighten lower shock nut and bolt. 406 ft/lbs, 30mm, 27mm, socket extension, use Blue Loctite if not replacing nut. NOTE: I don’t have a torque wrench (or impact wrench) that goes that high. I torqued it to 250 ft/lbs and then added another half turn. This isn’t a precise approach but I will follow up on this post if the shock ever comes loose.
- Reconnect tie rod end to steering knuckle. 85 ft/lbs, 21mm. *I don’t use Loctite on the tie rod ends.
- Go to your favorite mechanic and get an alignment.
Final Thoughts
This wasn’t an extremely tough project, but having the right tools is a necessity. It took me a weekend to get this and a tie rod upgrade completed. In hindsight, I would recommend doing it on a weekend when it wasn’t raining.
After reading the reviews, I expected the coils would lift the front end up a bit more than they did. I didn’t see much change however, maybe an inch at most. I am getting an alignment tomorrow and should have more information on the drivability of the springs soon.

Good luck on your install! Measure twice, cut once, have fun, enjoy the process!
~bigrig
Last edited:

