Ruger
FRF Addict
I got tired of waiting for someone to produce a dead pedal for the Raptor application, so I decided to design and fabricate one myself. Here's what I was going for in the design:
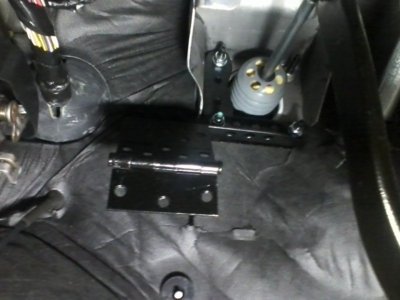
- A very firm mount. A single bolt just didn't seem sufficient when your whole left leg will be pushing on it. So my unit bolts to the upper left, lower left, and lower right bolts that surround the brake piston on the firewall. No need to remove and retorque those nuts, either. My unit goes on top of those nuts. The bottom of the dead pedal rests against the step in the floorboard on the driver's side, so the whole thing proves to be very solid.
- Easy installation. Three nuts and it's on.
- Easy cleaning/vacuuming. That's the idea behind the hinge. The pedal hinges up out of the way so that the rubber mat can easily be vacuumed or removed. I wanted to also be able to Velcro the pedal up against the lower edge of the dash so it could be out of the way when you don’t need it or just want to stretch out. Unfortunately there isn’t a surface at the bottom of the dash to affix Velcro to. Still working on that possibility.
Parts Needed:
- One 7.25" piece of 1 inch angle steel,
- Enough 3/32” mild steel to make the bracket
- A 3 inch wide gate hinge
- A 3 inch wide wooden board approximately 15 inches long
- A package of stick-on rubber tread material that Wal-Mart has in the auto department (seen it in auto parts stores, too). It is a Reese Towpower product - the folks who make a lot of the tow hitch gear you'll find in retail stores. It's called Sure Step, it's made of EPDM rubber, and its product number 10412.
- Appropriate nuts and bolts (the 3 nuts you need to mount the bracket to the firewall are 8M x 1.25)
- A can of Rustoleum truck bed paint for the bracket, and a can of flat black latex paint for the board.
It took me two days to do the design and welding work, and two days to wait for the paint to dry. I decided on a wooden pedal because wood is a lot less likely to flex under pressure than a steel plate. You can use steel if you want, but it'll need to be a pretty thick piece of steel to keep from bending. A steel plate would be heavy, and I thought that my Velcro-dependent swing-out-of-the-way notion wouldn't work as well.
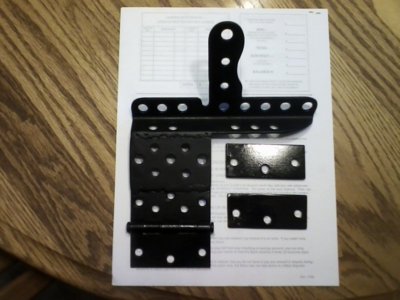
Look at the photo of the bracket. The two small plates are for mounting the board to the bracket. I know I'll need one - a big plate will be better than three washers for bolting the board to the hinge part of the bracket. Those two plates are of different thicknesses of steel, so using one or the other (or both) will enable me to adjust the angle of the pedal - a fine-tuning measure, and only if I need it.
You'll note a curve cut into the right side of the vertical part of the bracket. That's to clear the brake piston. You will also notice a U-shaped cut into the angle steel at the base of the left side of the vertical part of the bracket. That's to clear a piece of metal on the firewall next to the brake piston. The lightning holes are completely cosmetic.
The “Bracket Installed” photo shows the bracket installed on the three bolts around the brake piston. Nuts are 8M x 1.25. I elected to put two washers between the factory nuts and the bracket. This moved the bracket out from the firewall a bit, reducing the amount of pressure the bracket put on the factory sound deadening material to near zero.
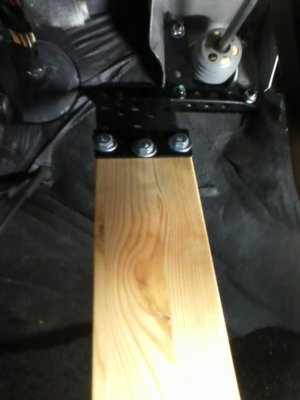
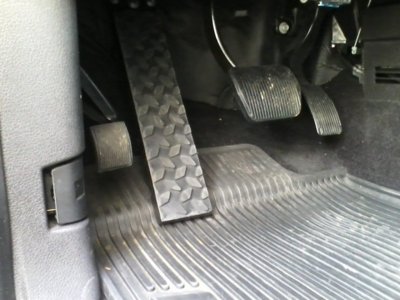
The “Pedal Fitment 1” photo shows the wooden pedal mounted to the bracket.
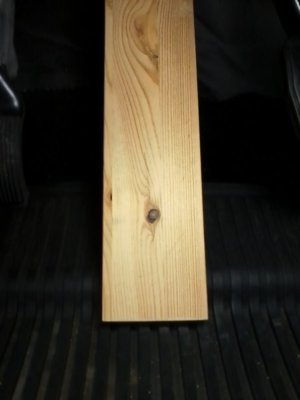
The “Pedal Fitment 2” photo shows how the bottom of the pedal mates with the step in the floorboard of the driver's footwell.
The only hitch to installation was mounting the bracket to the three brake piston bolts. Accessibility is not wonderful for a 59 year old man, but certainly not what I'd call challenging. After I got it bolted up I didn't like how much the bracket seemed to compress the factory sound deadening blanket on the inside of the firewall, so I took it back off, put two washers on each bolt, then the bracket, then another washer on each bolt, and then the lock nuts. Problem solved.
The design dimensions I arrived at provide a foot placement that's really quite comfortable. I don't know why the vendors find this project challenging, and I sure don't know why they don't make good use of that slight step in the footwell on the driver's side.
Anybody with access to a welder could build this. I don't have a mill or a lathe or any precision metal fabrication equipment. Just a gas welder, an old Sears Craftsman bench grinder, a DeWalt drill motor, bench vice, and hand tools. I don't even have a drill press!


Last edited:

