Harblar
Full Access Member
Last Wednesday The guys over at M&R Automotive offered up a free pair of Flush Mount Slicks to the first guy with M&R lights on their truck to pm them. I wasn't the first, but they were nice enough to send me a pair anyway! That alone made my day. What made my weekend is when they showed up at my door Saturday morning! That's Fast and over a holiday to boot!! Awesome!
The only thing they asked for in return was pics of the install and an honest review of the product. I'm going to do my best to make a detailed How To for installing these, so here it goes...
To start with lets go over a general list of tools needed for the install. (I'd also like to give credit to Reptar and his write up on the Rigid flush mount install process as it gave me a good starting point for these)
Tools I used:
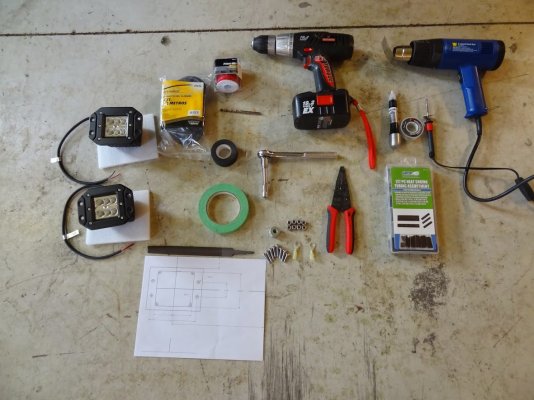
Above you will see the following tools: Power drill with 1/4" bit, Heat Gun, Soldering Iron, Solder, Touchup Paint (will need at somepoint, either to seal the cut edges or fix a slip... ), heatshrink tubing, Wire stripper/cutter, 7/16" and 11mm wrench or socket, allen wrench, Electrical tape, masking tape, a sharpie, 8 x 1/4" button head allen bolts 3/4"-1", 8 x flat washers, 8 x 1/4" locking nuts, a file, 2 x heatshrink ground connectors, Wire (12-16ga preferably), a grinding wheel (or dremel or plasma cutter or other metal cutting tool of your preference. All have advantages and drawbacks which I'll cover in a bit), measuring device (ruler or tape), a template (provided in this post), and of course... The Lights!
Plasma Cutter
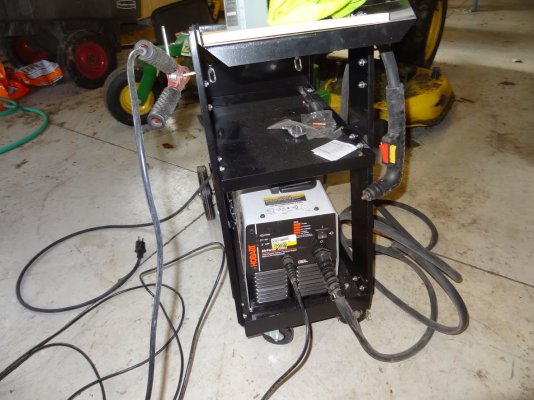
So, now that we're organized, let's begin!
Step 1:
Clean the bumper!
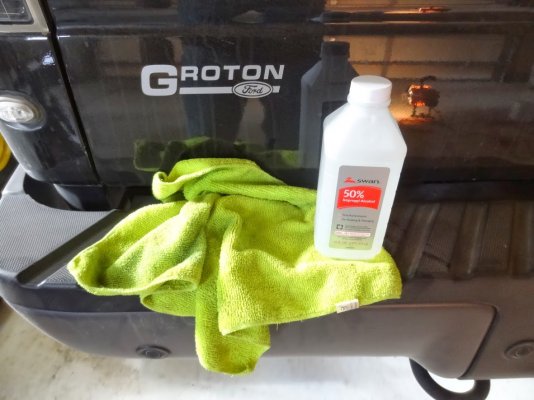
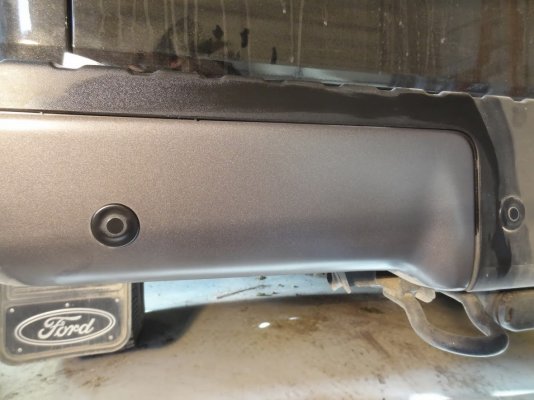
Once clean it will make it much more likely that your masking tape will actually stick to the bumper, which brings us to...
Step 2:
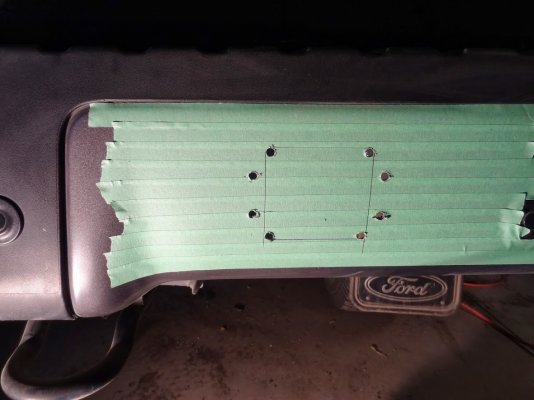
Mask off the area to be cut and drilled.
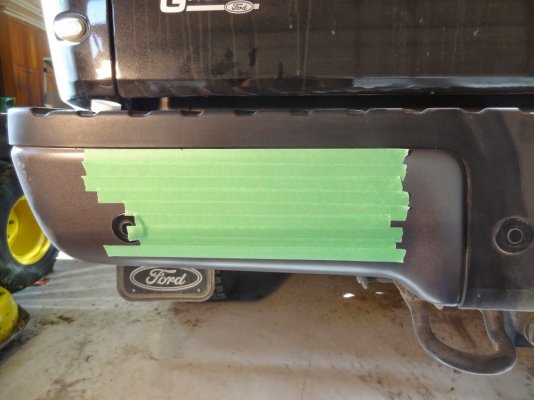
this will help to protect the bumper against a few minor slips and gives us a good place to draw some cutting guides with our sharpie in a bit.
Step 3:
Line up the drill template.
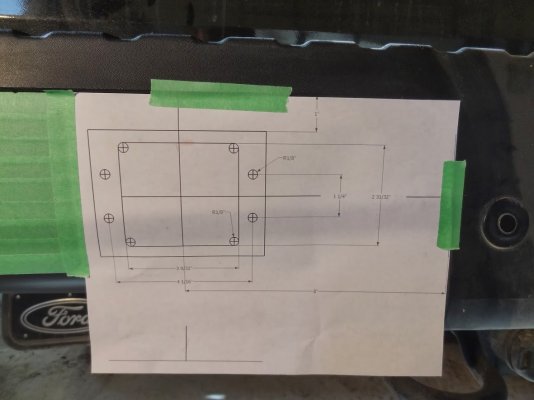
This is a template I made on the computer based off from precise measurements I took from the light.
Here is the Template:
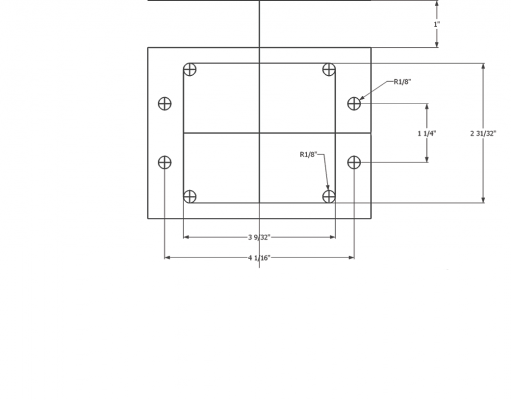
This is designed to be printed out at a 1:1 scale on a borderless setting. Please verify that the printed dimensions match up (specifically the 1.25" and the 4 1/16" between the mounting holes.) Double check that the four mounting drill guides line up precisely with the mounting holes on the Flush Mounts. If they don't the image and/or printer settings may need to be tweaked. I can't say too much else about that since everyone's setup is different. If your having problems, please feel free to ask and I'll try to help as best I can.
Other notes on the template. I printed mine out so that the top edge of the paper could be lined up nice and even on the bottom edge of the plastic portion of the bumper. This will give exactly 1" of space between the plastic and the edge of the light mount. I also chose to place the center of the light 8" from the right edge of the plastic. This is completely a user preference. 8" seems to center the light nicely on the bumper, but it will make it a tight fit for installing the nuts when mounting the light. You may want to choose 9" or even 10" for your light center. You'll see why in a bit.
Whatever you decide, measure the desired amount from the edge of the plastic portion of the bumper and mark with your sharpie. Align the center of the template with this mark and use the top edge of your paper matched up to the plastic portion of the bumper to ensure your vertical spacing is correct and level.
Step 4:
Point of no return...
Use a center punch to mark the drill points.
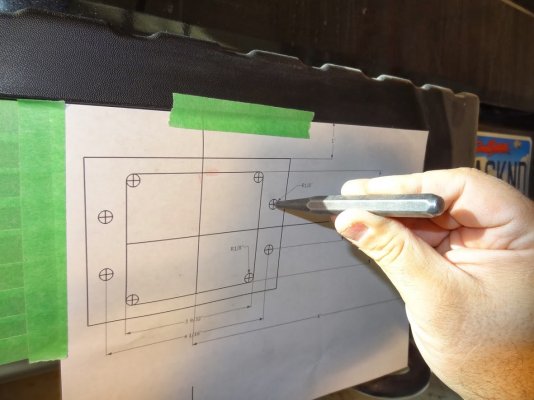
Be as precise as you can as inaccuracy could lead to a crooked light and/or holes that won't line up.
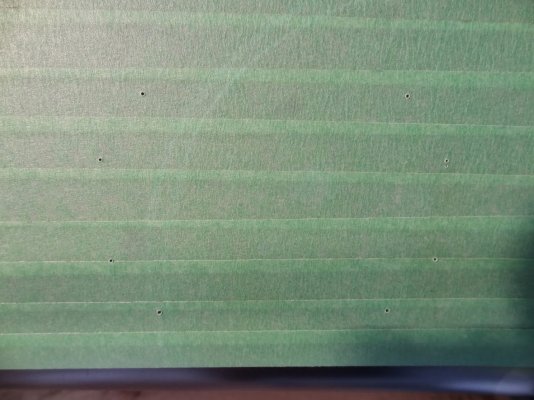
Step 5:
You're committed now! Use your 1/4" drill bit to drill the holes in your bumper.
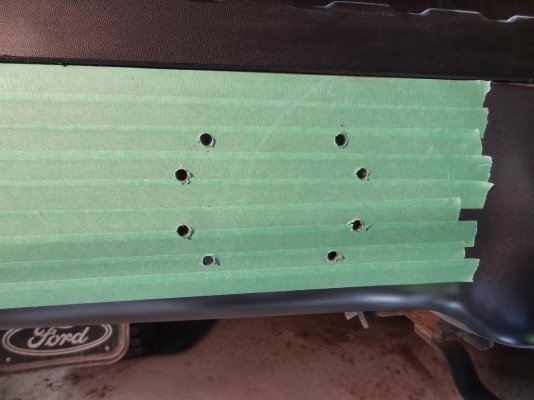
Step 6:
Use a straight edge to draw in the cut lines.
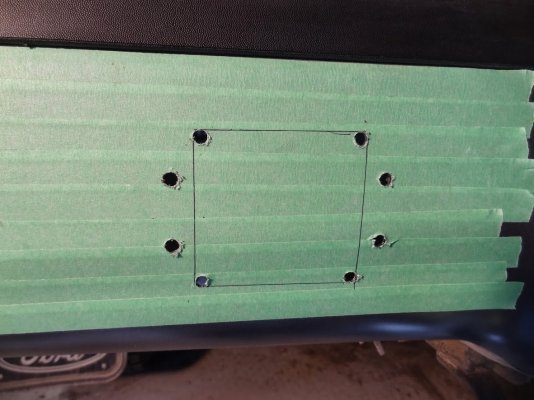
Step 7:
Break out the cutting tool of your choice.
In the end I ended up using a combination of the plasma torch and the grinder. Here's why:
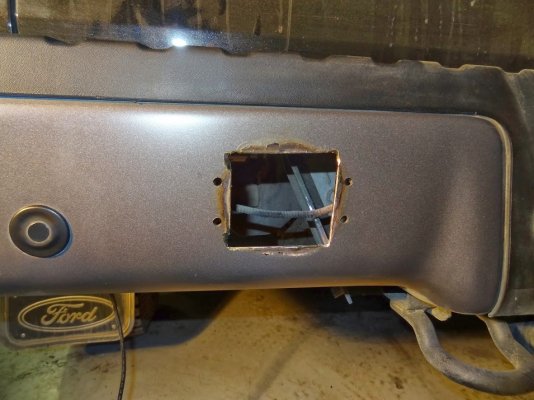
As you can see from the finished hole there was some damage to the paint (powder coating on the bumper). The Plasma cutter is a great tool (with a steady hand) as it cuts through the bumper like butter, but it produces enough heat to cause the discoloration and chipping of the bumper coating. this is fine on the sides since it will be covered up by the light mount, but the bezel on the top is too narrow to allow this margin of error. Enter the Grinding wheel. I used the grinding wheel to cut the top and bottom of the hole and while this didn't cause any discoloration or flaking it is slightly harder to control. Be careful not to let it cut too deep into the bumper. There is very little room for error in the corners as they are very close to the edge of the bracket. A Dremel and/or a key hole hacksaw may prove to be much more precise and easier to control, but will take much longer and be a bit more tiring. In the end use what you are most comfortable and confident with.
Step 8:
File away any sharp edges or ridges that may be present from the cutting and test fit the light and bolts.
If the light doesn't fit flush and/or the holes dont line up perfectly additional trimming of the hole may be required. Do so sparingly bit by bit until it fits to avoid any gaps that might show after the light is mounted.
Step 9:
Success! One hole has been cut in your truck! Have a beer to calm your nerves and pat yourself on the back. Then man up and go back to Step 1 and repeat on the other side of the bumper!
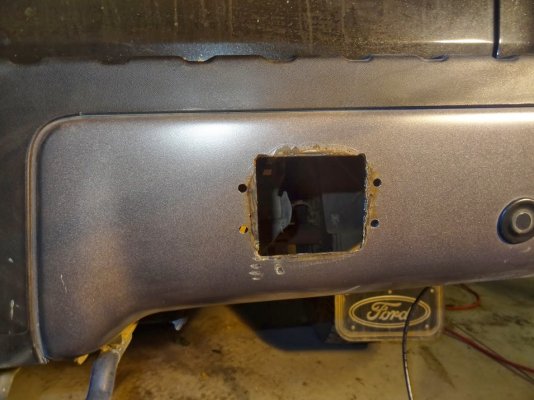
As you can see... my grinder slipped on me on the passenger side
Step 10:
Apply your touch up paint to any blemishes you might have and use it to seal up the edges of the hole you cut to prevent rusting. The bumper color paint code is UJ or UX (from what I've been able to find) or Toyota 180. You might have to order it online. I did because I couldn't find it locally. All three are apperently close, but not exact, likely stemming from the fact that the bumper is powder coated and not painted. Maybe now is the perfect opportunity to plastidip your bumper and flares, get them Line-X'd, or Paint matched.
Step 11:
After your paint is dry, go ahead and mount your lights up!
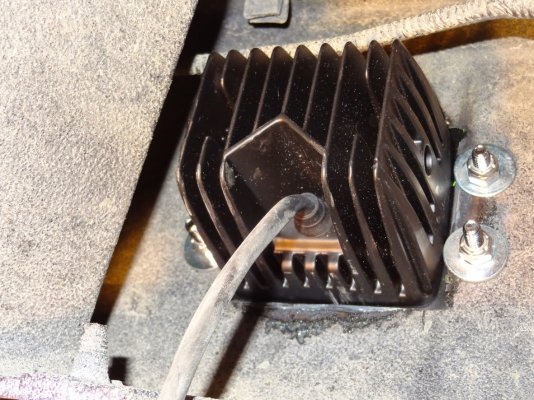
As I mentioned earlier things get a little tight at 8". My socket was unable to fit in the left side to get to the nuts, so I had to use the 7/16" wrench and wrap (contort) my arm up, around, and back behind the frame to get to the bolt. At 9"-10" the socket would work fine. Again, personal preference.
Step 12:
Time to bring out the inner electrician!
Start by disconnecting the ground wire on the truck's battery to prevent any chance of arcing or shorts. Then peal back the insulator from the red and black wires on the light.
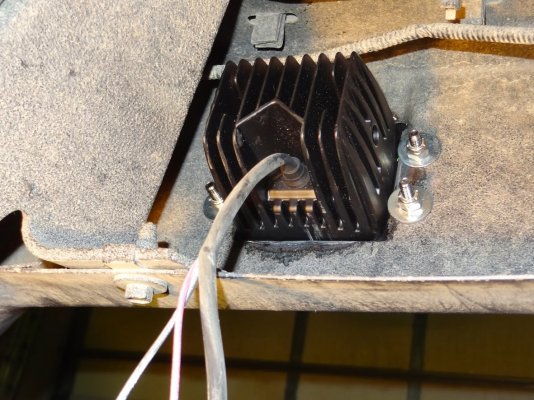
Let's start with the ground. No sense having it any longer than it needs to be.
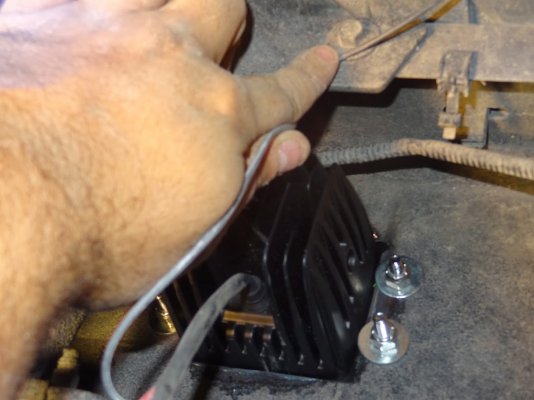
I chose to mount the ground to this bolt, where the bumper connects to the frame.
Go ahead and cut the black wire so it will easily reach this bolt and then strip away 1/4" or so of the wire and attach a ring connector to it.
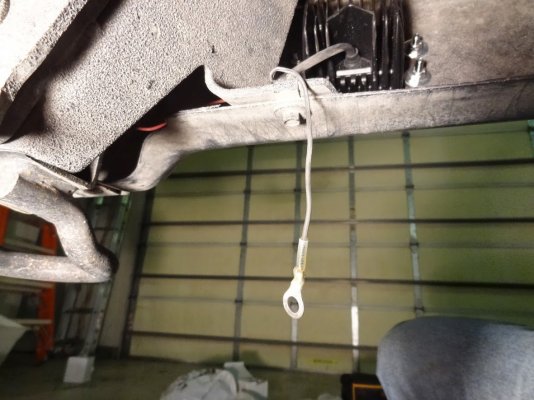
I chose to use a a crimp on ring connector with a heatshrink jacket. Again, this is preference if you want to solder it, use crimp connectors, or install quick disconnects between the ring and the light is all up to you and all will work fine. If you choose not to use shrink tubing be sure to at least wrap the splices and connections in electrical tape to protect them.
Step 13:
Connect the ground to the frame. Simply remove the bolt using a 10mm socket, slip the ring terminal over the end of the bolt and reinstall it. The bumper will shift slightly when the bolt is removed, but will return to it's original position when reinstalled.
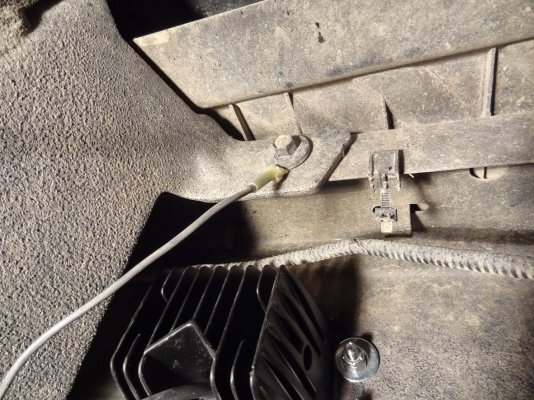
Repeat this process for the ground on the other light.
Step 14:
Now comes the decision of how you want the lights to operate. do you want them to come on with the reverse lights? Do you want to control them with an upfitter? Maybe use a separate switch or a combination of those?
I chose to wire it so that the lights would come automatically when in reverse or whenever I activated switch number 4 on the upfitters.
To do like me continue here!
First, pull back the plastic conduit from the 7 pin trailer plug. Unwrap the tape on the conduit and pull it back so that you can easily get to the wires. At least 5-6 inches to make it easier to work with.
The Wire we are going to splice into is the grey wire with the brown stripe. It's easy to find as it comes directly out of the center of the plug.
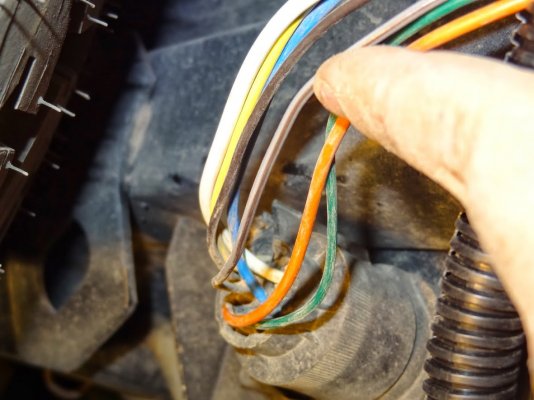
Next run the Red wire from the light behind the frame and over to the trailer light plug.
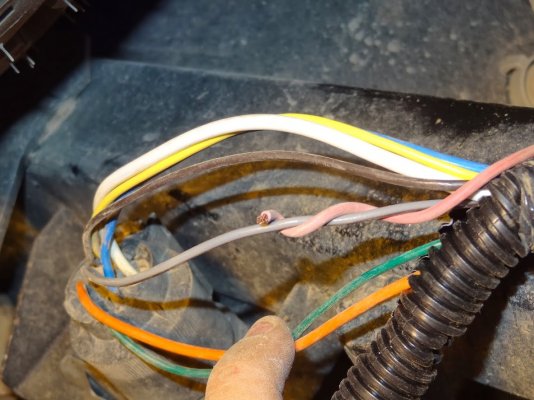
From here you have have several options. The easiest is to use a simple wire splice. I chose to go for a little cleaner connection.
Strip about an inch of jacketing off from the red light wire and then cut the grey/brown wire and do the same to both ends. In addition cut a 3-4 foot length of 12-16ga wire (we'll call it an extension wire)to run over to the second light. Twist together one end of the extension wire with the wire on the trailerplug and fit a piece of shrink tubing over them. Then twist together the wire from the light and the other part of the grey/brown wire. When finished it should look like below.
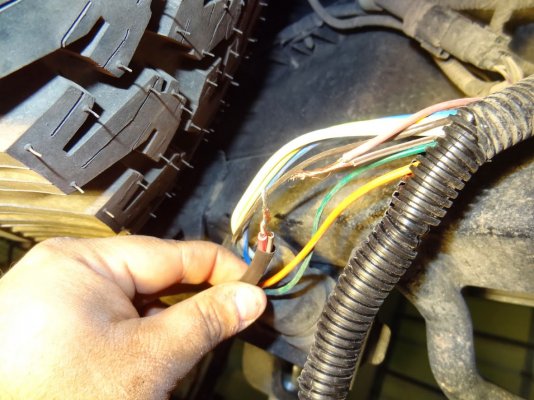
Now twist these two together and solder them so that they can't come lose. Slide the shrink tubing over the bare wires and shrink.
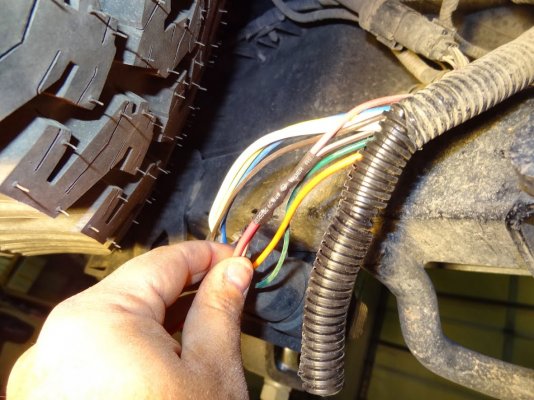
Go ahead and re wrap the conduit back around the trailer wires and put on some new electrical tape to seal it up.
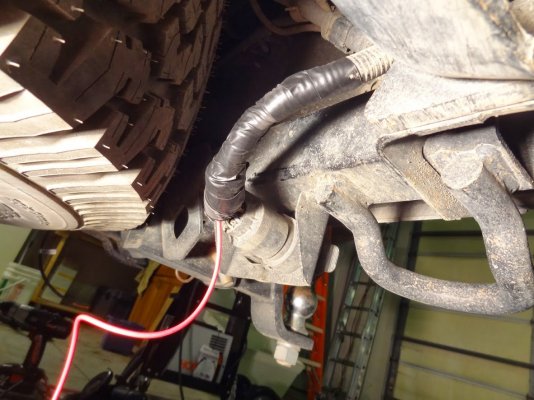
If you plan on only using an upfitter ignore the trailer plug and simply attach the extension wire to the light wire.
Step 15:
Run the extension wire over to the other light. Be sure to run it up inside the bumper so that it can't snag on anything while offroading.
Cut the red wire from the light short and cut off the excess from the extension wire. Strip and Twist them together. Slide a piece of heat shrink over them and then solder to a long wire that will be run to the engine bay for the upfitter. (This length will vary depending on whether you own a Super Cab or a Super Crew. Pull enough wire to reach the front bumper and then add 5 feet for good measure.)
Shrink the heatshrink on the connection.
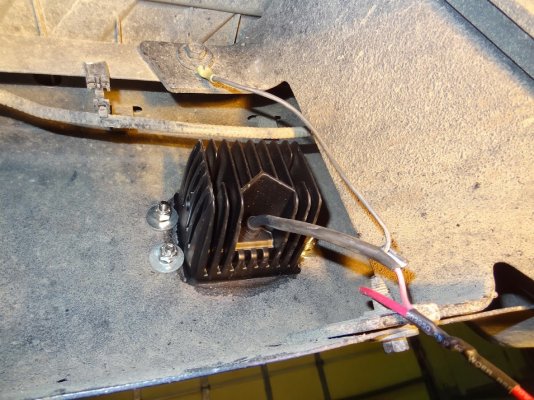
Step 16:
Time to thread the long wire up to the engine bay. Do this at your own discretion and with common sense in mind. I pulled mine up over the rear wheel well and then along a channel between the running boards and doors and finally up over the backing on the front wheel well. Use zip ties when ever possible to secure the wire and feel free to wrap it in wire conduit wherever you think it might need the added protection.
Step 17:
Time to hook it to the upfitter's. (This assumes that you have already hooked up the aux wires inside the cab to the ones in the engine bay. If you haven't GO HERE and DO THAT) I wired mine up to Aux 4, but once again, that's up to you.
I had mine all hooked up and ready so all I had to do was Cut, strip, solder, and heat shrink the two ends together.
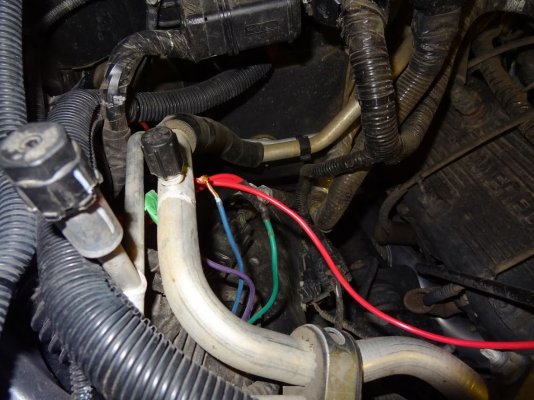
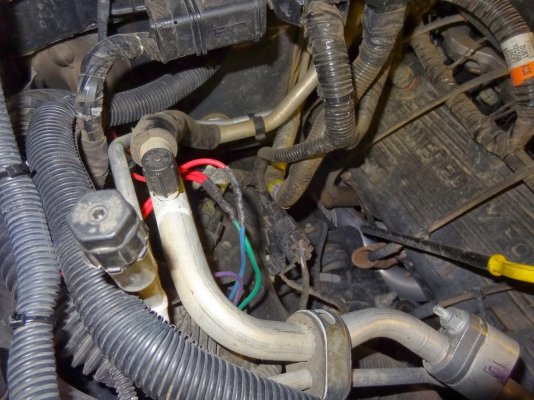
Step 18:
Reattach the battery ground and give it a test!
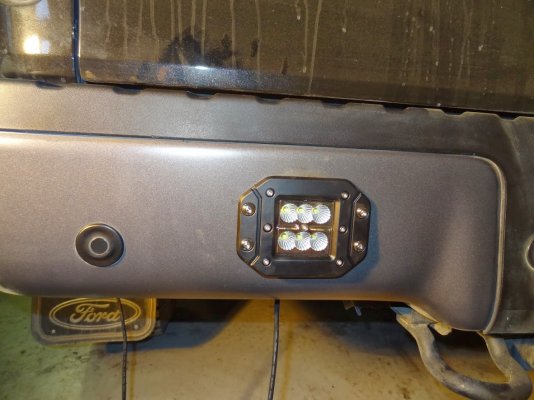
If you did everything right, it should look like this when you're finished...
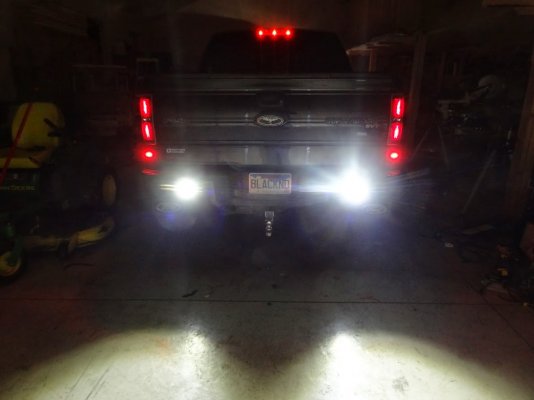
They are nice and bright and they don't even mess with the rear view camera!
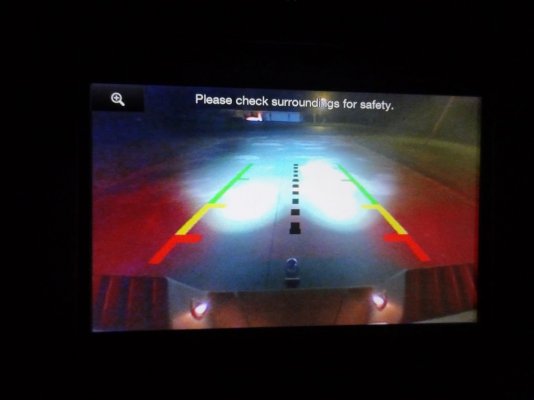
I haven't had much of a chance to try these out yet, since I haven't gone anywhere at night within the last couple of days, but what little I have has been impressive. They effectively light up quite a ways behind me. Do to the bumpers angle, though, they do aim down a little more than I might like, but overall not bad. Some type of angled shim between the light and bracket might be able to give it a better angle, but it's certainly not a deal breaker.
Step 19:
Have another beer! Go on... you earned it! Job well done!
Step 20:
There is no step 20... I just hate ending on an odd number.
This is the third set of M&R lights I've installed on my truck (30/40" behind the grill bar and V2 90W Hood Lights) and I'm still impressed by the quality and brightness of these lights. The only thing better is the customer service. I haven't had any problems with my lights yet, but I know from the conversations I've had with M&R and other user feedback that it would be a non-issue if I did. Highly Recommended! I'll update with my experience as needed, but so far I couldn't be happier with them. (barring my own muck ups during the install process, that is.)
Any questions, comments, or suggestions that might add to the information contained here and help others, please feel free to share!
The only thing they asked for in return was pics of the install and an honest review of the product. I'm going to do my best to make a detailed How To for installing these, so here it goes...
To start with lets go over a general list of tools needed for the install. (I'd also like to give credit to Reptar and his write up on the Rigid flush mount install process as it gave me a good starting point for these)
Tools I used:

Above you will see the following tools: Power drill with 1/4" bit, Heat Gun, Soldering Iron, Solder, Touchup Paint (will need at somepoint, either to seal the cut edges or fix a slip...
 ), heatshrink tubing, Wire stripper/cutter, 7/16" and 11mm wrench or socket, allen wrench, Electrical tape, masking tape, a sharpie, 8 x 1/4" button head allen bolts 3/4"-1", 8 x flat washers, 8 x 1/4" locking nuts, a file, 2 x heatshrink ground connectors, Wire (12-16ga preferably), a grinding wheel (or dremel or plasma cutter or other metal cutting tool of your preference. All have advantages and drawbacks which I'll cover in a bit), measuring device (ruler or tape), a template (provided in this post), and of course... The Lights!
Plasma Cutter

So, now that we're organized, let's begin!
Step 1:
Clean the bumper!


Once clean it will make it much more likely that your masking tape will actually stick to the bumper, which brings us to...
Step 2:
Mask off the area to be cut and drilled.

this will help to protect the bumper against a few minor slips and gives us a good place to draw some cutting guides with our sharpie in a bit.
Step 3:
Line up the drill template.

This is a template I made on the computer based off from precise measurements I took from the light.
Here is the Template:

This is designed to be printed out at a 1:1 scale on a borderless setting. Please verify that the printed dimensions match up (specifically the 1.25" and the 4 1/16" between the mounting holes.) Double check that the four mounting drill guides line up precisely with the mounting holes on the Flush Mounts. If they don't the image and/or printer settings may need to be tweaked. I can't say too much else about that since everyone's setup is different. If your having problems, please feel free to ask and I'll try to help as best I can.
Other notes on the template. I printed mine out so that the top edge of the paper could be lined up nice and even on the bottom edge of the plastic portion of the bumper. This will give exactly 1" of space between the plastic and the edge of the light mount. I also chose to place the center of the light 8" from the right edge of the plastic. This is completely a user preference. 8" seems to center the light nicely on the bumper, but it will make it a tight fit for installing the nuts when mounting the light. You may want to choose 9" or even 10" for your light center. You'll see why in a bit.
Whatever you decide, measure the desired amount from the edge of the plastic portion of the bumper and mark with your sharpie. Align the center of the template with this mark and use the top edge of your paper matched up to the plastic portion of the bumper to ensure your vertical spacing is correct and level.
Step 4:
Point of no return...
Use a center punch to mark the drill points.

Be as precise as you can as inaccuracy could lead to a crooked light and/or holes that won't line up.

Step 5:
You're committed now! Use your 1/4" drill bit to drill the holes in your bumper.

Step 6:
Use a straight edge to draw in the cut lines.

Step 7:
Break out the cutting tool of your choice.
In the end I ended up using a combination of the plasma torch and the grinder. Here's why:

As you can see from the finished hole there was some damage to the paint (powder coating on the bumper). The Plasma cutter is a great tool (with a steady hand) as it cuts through the bumper like butter, but it produces enough heat to cause the discoloration and chipping of the bumper coating. this is fine on the sides since it will be covered up by the light mount, but the bezel on the top is too narrow to allow this margin of error. Enter the Grinding wheel. I used the grinding wheel to cut the top and bottom of the hole and while this didn't cause any discoloration or flaking it is slightly harder to control. Be careful not to let it cut too deep into the bumper. There is very little room for error in the corners as they are very close to the edge of the bracket. A Dremel and/or a key hole hacksaw may prove to be much more precise and easier to control, but will take much longer and be a bit more tiring. In the end use what you are most comfortable and confident with.
Step 8:
File away any sharp edges or ridges that may be present from the cutting and test fit the light and bolts.

If the light doesn't fit flush and/or the holes dont line up perfectly additional trimming of the hole may be required. Do so sparingly bit by bit until it fits to avoid any gaps that might show after the light is mounted.
Step 9:
Success! One hole has been cut in your truck! Have a beer to calm your nerves and pat yourself on the back. Then man up and go back to Step 1 and repeat on the other side of the bumper!


As you can see... my grinder slipped on me on the passenger side

Step 10:
Apply your touch up paint to any blemishes you might have and use it to seal up the edges of the hole you cut to prevent rusting. The bumper color paint code is UJ or UX (from what I've been able to find) or Toyota 180. You might have to order it online. I did because I couldn't find it locally. All three are apperently close, but not exact, likely stemming from the fact that the bumper is powder coated and not painted. Maybe now is the perfect opportunity to plastidip your bumper and flares, get them Line-X'd, or Paint matched.

Step 11:
After your paint is dry, go ahead and mount your lights up!

As I mentioned earlier things get a little tight at 8". My socket was unable to fit in the left side to get to the nuts, so I had to use the 7/16" wrench and wrap (contort) my arm up, around, and back behind the frame to get to the bolt. At 9"-10" the socket would work fine. Again, personal preference.
Step 12:
Time to bring out the inner electrician!
Start by disconnecting the ground wire on the truck's battery to prevent any chance of arcing or shorts. Then peal back the insulator from the red and black wires on the light.

Let's start with the ground. No sense having it any longer than it needs to be.

I chose to mount the ground to this bolt, where the bumper connects to the frame.
Go ahead and cut the black wire so it will easily reach this bolt and then strip away 1/4" or so of the wire and attach a ring connector to it.

I chose to use a a crimp on ring connector with a heatshrink jacket. Again, this is preference if you want to solder it, use crimp connectors, or install quick disconnects between the ring and the light is all up to you and all will work fine. If you choose not to use shrink tubing be sure to at least wrap the splices and connections in electrical tape to protect them.
Step 13:
Connect the ground to the frame. Simply remove the bolt using a 10mm socket, slip the ring terminal over the end of the bolt and reinstall it. The bumper will shift slightly when the bolt is removed, but will return to it's original position when reinstalled.

Repeat this process for the ground on the other light.
Step 14:
Now comes the decision of how you want the lights to operate. do you want them to come on with the reverse lights? Do you want to control them with an upfitter? Maybe use a separate switch or a combination of those?
I chose to wire it so that the lights would come automatically when in reverse or whenever I activated switch number 4 on the upfitters.
To do like me continue here!
First, pull back the plastic conduit from the 7 pin trailer plug. Unwrap the tape on the conduit and pull it back so that you can easily get to the wires. At least 5-6 inches to make it easier to work with.
The Wire we are going to splice into is the grey wire with the brown stripe. It's easy to find as it comes directly out of the center of the plug.

Next run the Red wire from the light behind the frame and over to the trailer light plug.

From here you have have several options. The easiest is to use a simple wire splice. I chose to go for a little cleaner connection.
Strip about an inch of jacketing off from the red light wire and then cut the grey/brown wire and do the same to both ends. In addition cut a 3-4 foot length of 12-16ga wire (we'll call it an extension wire)to run over to the second light. Twist together one end of the extension wire with the wire on the trailerplug and fit a piece of shrink tubing over them. Then twist together the wire from the light and the other part of the grey/brown wire. When finished it should look like below.

Now twist these two together and solder them so that they can't come lose. Slide the shrink tubing over the bare wires and shrink.

Go ahead and re wrap the conduit back around the trailer wires and put on some new electrical tape to seal it up.

If you plan on only using an upfitter ignore the trailer plug and simply attach the extension wire to the light wire.
Step 15:
Run the extension wire over to the other light. Be sure to run it up inside the bumper so that it can't snag on anything while offroading.
Cut the red wire from the light short and cut off the excess from the extension wire. Strip and Twist them together. Slide a piece of heat shrink over them and then solder to a long wire that will be run to the engine bay for the upfitter. (This length will vary depending on whether you own a Super Cab or a Super Crew. Pull enough wire to reach the front bumper and then add 5 feet for good measure.)
Shrink the heatshrink on the connection.

Step 16:
Time to thread the long wire up to the engine bay. Do this at your own discretion and with common sense in mind. I pulled mine up over the rear wheel well and then along a channel between the running boards and doors and finally up over the backing on the front wheel well. Use zip ties when ever possible to secure the wire and feel free to wrap it in wire conduit wherever you think it might need the added protection.
Step 17:
Time to hook it to the upfitter's. (This assumes that you have already hooked up the aux wires inside the cab to the ones in the engine bay. If you haven't GO HERE and DO THAT) I wired mine up to Aux 4, but once again, that's up to you.
I had mine all hooked up and ready so all I had to do was Cut, strip, solder, and heat shrink the two ends together.


Step 18:
Reattach the battery ground and give it a test!
If you did everything right, it should look like this when you're finished...

They are nice and bright and they don't even mess with the rear view camera!

I haven't had much of a chance to try these out yet, since I haven't gone anywhere at night within the last couple of days, but what little I have has been impressive. They effectively light up quite a ways behind me. Do to the bumpers angle, though, they do aim down a little more than I might like, but overall not bad. Some type of angled shim between the light and bracket might be able to give it a better angle, but it's certainly not a deal breaker.
Step 19:
Have another beer! Go on... you earned it! Job well done!

Step 20:
There is no step 20... I just hate ending on an odd number.
This is the third set of M&R lights I've installed on my truck (30/40" behind the grill bar and V2 90W Hood Lights) and I'm still impressed by the quality and brightness of these lights. The only thing better is the customer service. I haven't had any problems with my lights yet, but I know from the conversations I've had with M&R and other user feedback that it would be a non-issue if I did. Highly Recommended! I'll update with my experience as needed, but so far I couldn't be happier with them. (barring my own muck ups during the install process, that is.)
Any questions, comments, or suggestions that might add to the information contained here and help others, please feel free to share!

