KaiserM715
Kaiser Söze
After having my license since June and my radio since July, I finally had time to get it all installed. I wanted to go the ham route for a couple of reasons. Hams definitely have more range over CBs, family radios or cell phones (if you can’t hit a tower). I can hit most of the race radio freqs with my current setup and I know a mod is out there to get the rest. Also, living in a hurricane prone area, ham was the only comm available after some of the hurricanes. Plus, I can talk to the International Space Station (who also uses Kenwood).
I picked Kenwood based on several reviews discussing ease of use and programming. Not to mention, I have a local ham who uses them and has been helping me with programming. This unit is basically two radios in one box. I can pick a channel for each side, listen to both and switch back and forth to talk on each of them.
Here is what I installed:
Kenwood TM-V71A Dual Band w/ CAP mod (I bought it that way – allows TX up to 151.999Mhz))
Kenwood - TM-V71A
Kenwood DFK-3D panel kit (head unit separation kit)
Kenwood PG-5F extension cable
Comet CP-5N Lip mount
NCG Company::::::::::::::::::::::::::::::::::::::::::::::::::::::::::::::::::::::::::::::
Comet SBB-5 antenna
NCG Company::::::::::::::::::::::::::::::::::::::::::::::::::::::::::::::::::::::::::::::
Data cable off of eBay
Split loom
LOTS of zip ties
I soldered all connections and sealed them with adhesive heat shrink.
I got a lot of my ideas from BigJ’s install. Read more on his here:
http://www.fordraptorforum.com/f12/dual-band-ham-2-way-amateur-radio-install-frs-gmrs-mod-7519/
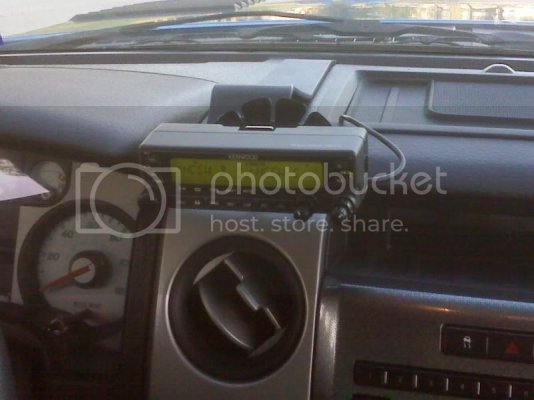
I decided to mount my antenna on the passenger’s side of the tailgate, the main radio unit behind the rear seat and the head unit on the center stack. Here is a good thread describing how to removed the upper portion of the backseat in a Super Cab:
How to remove 2009/2010 Supercab rear upper seat - F150online Forums
The best method I found was to stick my hand behind the seat and unclip the plastic mount with my finger, while pushing down a little on the top of the seat. I can probably get it out in under 30 seconds after having done it a couple of times.
I mounted my antenna mount on the tailgate, ran the cable along the edge and down under the bed. I also encased the cable with split loom for some additional protection.
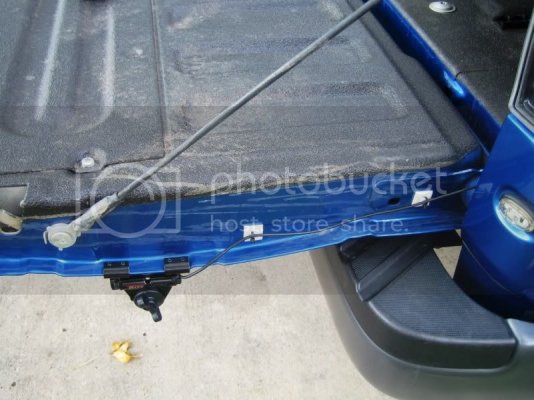
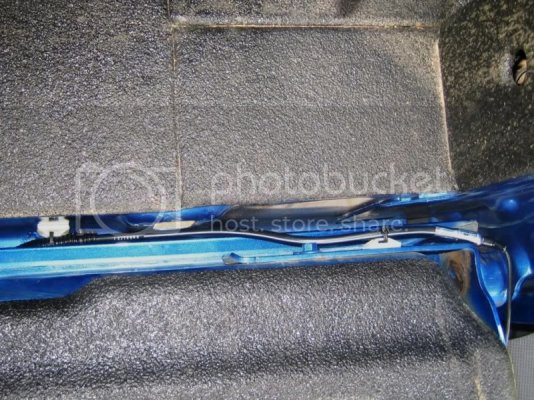
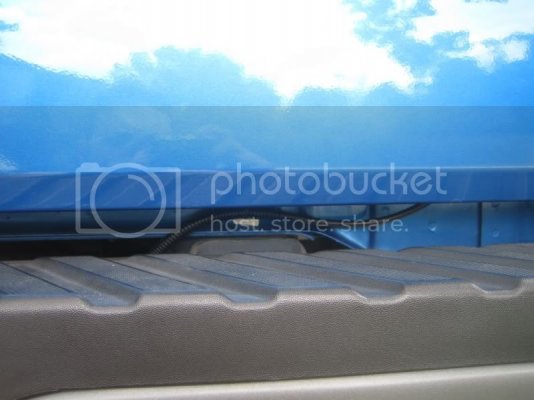
The cable goes under the bed and into the frame rail, to keep it protected from gravel, etc.
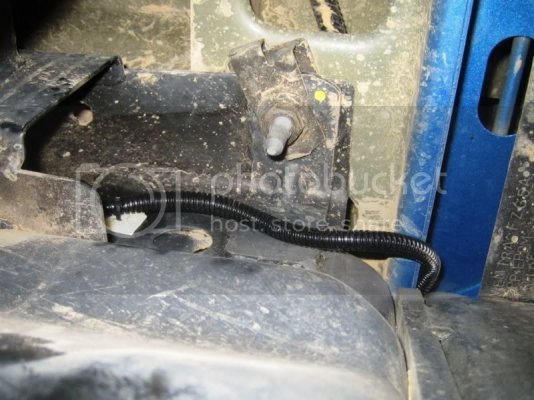
I used a fish tape to route the cable though the frame rail. The cable exits at the forward most bed mount, and is routed through the cab vent behind the back seat. I didn’t take any pics of this, but you can look at Phyguy’s version:
http://www.fordraptorforum.com/f12/icom-id-880h-install-lots-pics-16688/#post266595
Next, I worked on the power side of it. The extension kit I bought came with a long power cable. I soldered some ring terminals on the ends (also added heat shrink) so that they could be directly connected to the battery. Then, I inserted the wires inside of split loom and routed it along the existing wiring harness as well as the harness for my light bar.
Excuse the bad pics, I took them at night.
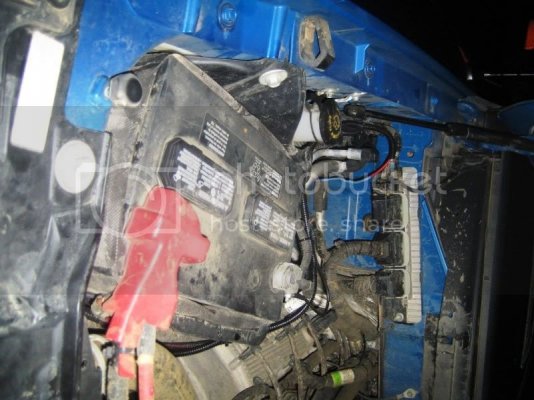
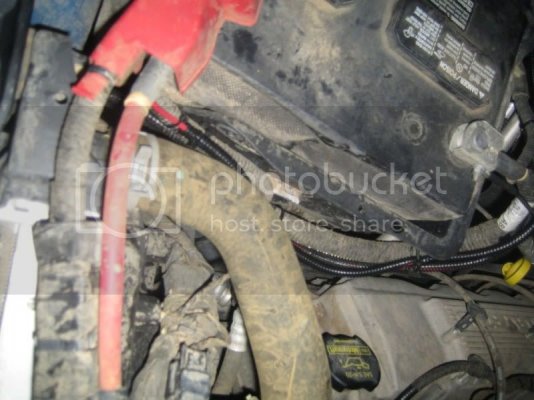
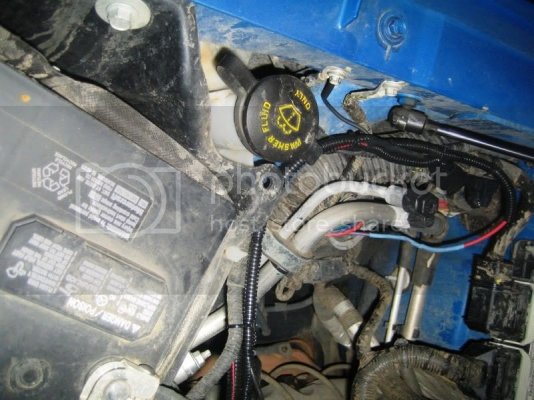
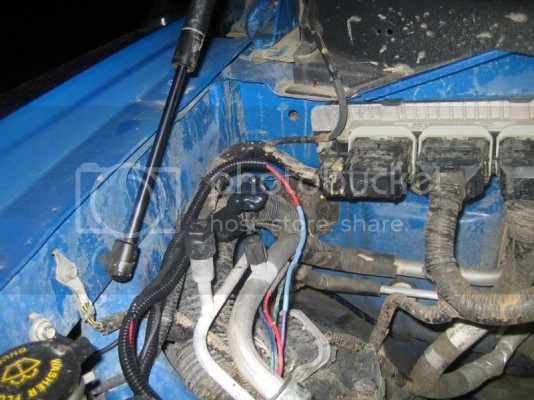
I used the same grommet as All The Way to get through the firewall. Take a look here:
http://www.fordraptorforum.com/f12/yaesu-ft-8800r-install-12575/
Then I routed the wiring behind the passenger kick panel, under the sill plate and behind the trim panel behind the back seat. There is a pic of that later.
Now we will cover the wires for the head unit, mic and external speakers. After
With the main unit mounted behind the seat, the speaker would be pretty muffled. I bought a pair of relatively cheap external speakers (one for each channel). After some thinking over, I mounted them with zip ties to the front pedestals of the driver’s seat frame. I checked the path of the seat and it can move forward and back with plenty of clearance between it and the speakers. Here is a pic with the seat all of the way back:
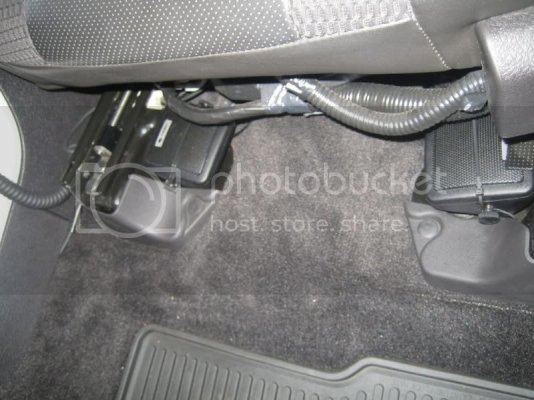
Here are the wires for the head unit and mic. This is where the head unit wire enters the driver’s side of the console. The mic is plug into the extension connector, which is zip tied to the bottom of the seat track.
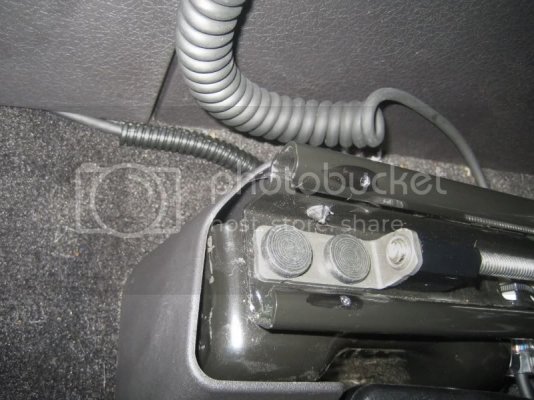
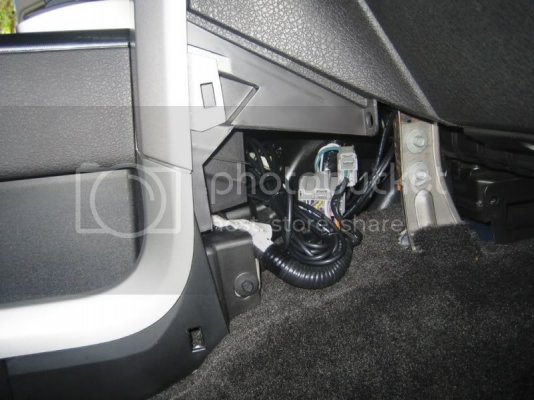
I removed the kick panels on each side of the center console. The head unit cable continues on inside of the console. The extension connector is attached to the heater duct with double sided tape (white connector behind the cable bundle). The remote head unit cable plug in here, with the excess bundled.
Next, I disassembled the center console as described by J here: http://www.fordraptorforum.com/f12/...r-radio-install-frs-gmrs-mod-7519/#post109730
I routed the cable up through the console to the switch panel based on the way that All The Way routed his aux speaker cable as described here:
http://www.fordraptorforum.com/f12/yaesu-ft-8800r-install-12575/#post194117
Here is what the cable looks like after install:
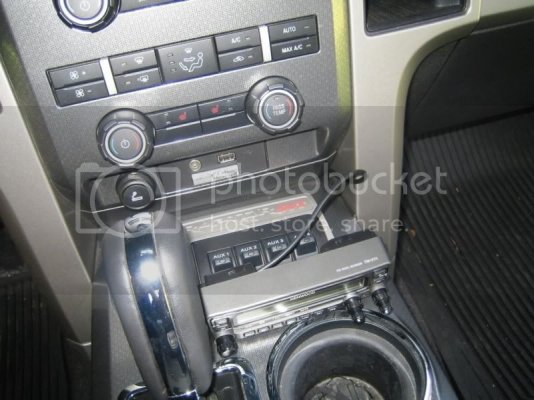
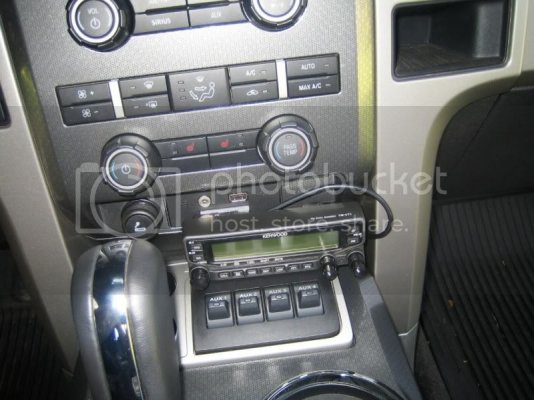
I bundled the head unit, mic and speaker connectors together, inserted them into split look and routed them along the bottom of the driver’s seat track (in between the seat track and the console) across the back floor board and under the back seat.
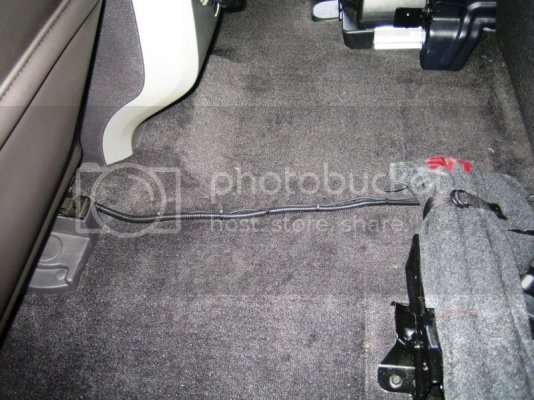
Now with the floor mat on top
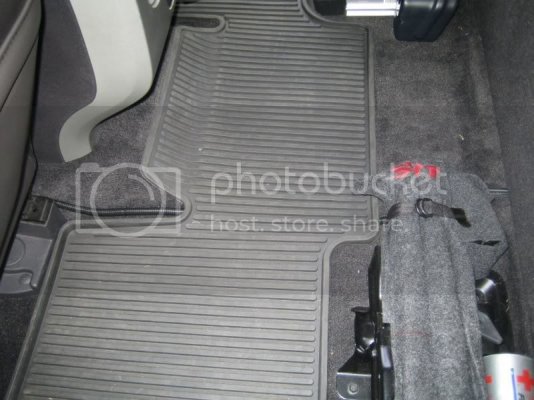
I picked this location as it worked well with all of my other plans for cable routing, is in a low foot traffic location and with the mat installed is fairly protected.
Now for the main unit. I installed this after the antenna, but I wanted to discuss all of the cable routing, too, so I will cover it all here. I picked behind the seat for a couple of reasons. I park outside, so this is completely hidden. Also, I don’t have to worry about it being kicked or stepped on. After removing the back seat, I looked at several locations for mounting. I picked this location based on room for the unit for cooling. I marked the location and removed the rear sound insulation (it attaches with 5 christmas trees). I trimmed the insulation with shears to allow for plenty of room around the main unit. Then, I marked and drilled the rear cab wall for the mount. I used stainless bolts, washers and lock nuts. I also applied silicone under the head of the nut and on both sides of the washer, for exterior sealing. I had a buddy come help me install this part. Afterwards the insulation was reinstalled. Then, I hooked up the cables, coiled the excess and zip tied everything together.
Here it is, all installed:
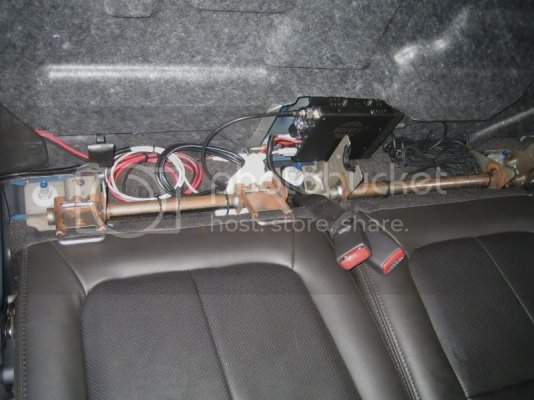
The wires on the left: power, antenna and programming. The wires on the right are head unit, mic and aux speakers. The bulge just up and to the right of the main unit is the power sliding window motor.
One word of caution. Quite a bit of the mounts, etc back here are SHARP. They were stamped out without dressing the edges. I sliced up my fingers a couple of times without noticing it until I saw all of the blood.
Referring to the pic above, the programming cable enters some split loom and goes off to the left. I routed it around and zip tied to the rear seat mount for access with the rear seat in. As I usually have a kiddy seat in the back, this will make programming much easier.
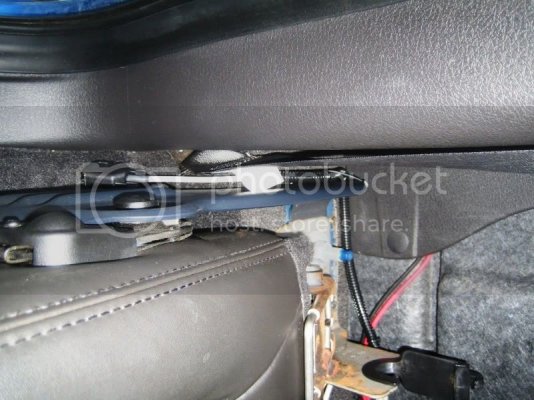
It will stick out far enough for me to hook my usb cable up and then tuck back behind the seat belt when not in use.
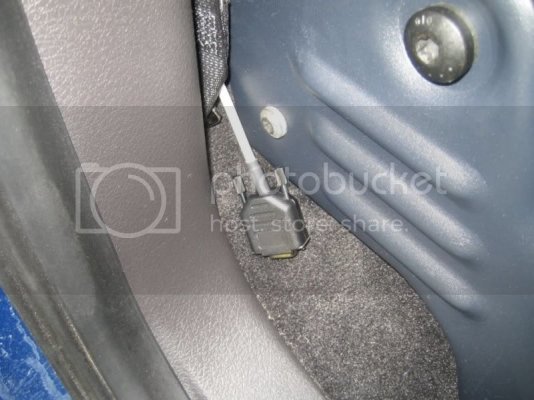
This was a pretty time intensive install for me. I worked on it for most of one weekend (all day Sat and all of Sun afternoon) and an additional Sunday afternoon. I spent quite a bit of time thinking about where to route things, etc. Your mileage may vary...
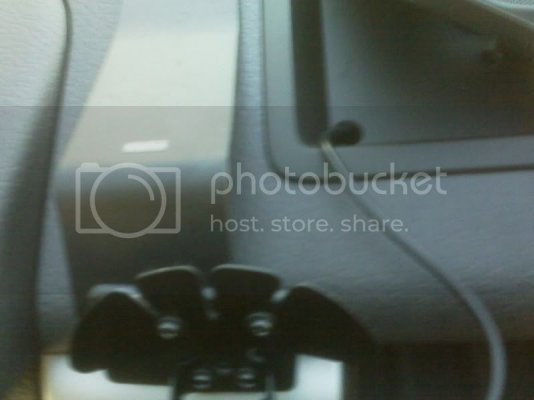
I have a couple of things left to finish. I need to figure out a mic mount. I will likely do something similar to what All The Way did here: http://www.fordraptorforum.com/f12/yaesu-ft-8800r-install-12575/#post194117 I also need to figure out something for the head unit. With the mounting back for the remote head installed, it is too big to mount where it currently sits (ala BigJ style). I am think of getting one of those ProClip mounts like CineSLR has in his truck. Take a look here: http://www.fordraptorforum.com/f65/cinema-slrs-camera-vehicle-2505/index2.html#post43824 J also mentioned the one I will very likely use here: http://www.fordraptorforum.com/f10/interior-device-mounting-solutions-5493/
I picked Kenwood based on several reviews discussing ease of use and programming. Not to mention, I have a local ham who uses them and has been helping me with programming. This unit is basically two radios in one box. I can pick a channel for each side, listen to both and switch back and forth to talk on each of them.
Here is what I installed:
Kenwood TM-V71A Dual Band w/ CAP mod (I bought it that way – allows TX up to 151.999Mhz))
Kenwood - TM-V71A
Kenwood DFK-3D panel kit (head unit separation kit)
Kenwood PG-5F extension cable
Comet CP-5N Lip mount
NCG Company::::::::::::::::::::::::::::::::::::::::::::::::::::::::::::::::::::::::::::::
Comet SBB-5 antenna
NCG Company::::::::::::::::::::::::::::::::::::::::::::::::::::::::::::::::::::::::::::::
Data cable off of eBay
Split loom
LOTS of zip ties
I soldered all connections and sealed them with adhesive heat shrink.
I got a lot of my ideas from BigJ’s install. Read more on his here:
http://www.fordraptorforum.com/f12/dual-band-ham-2-way-amateur-radio-install-frs-gmrs-mod-7519/
I decided to mount my antenna on the passenger’s side of the tailgate, the main radio unit behind the rear seat and the head unit on the center stack. Here is a good thread describing how to removed the upper portion of the backseat in a Super Cab:
How to remove 2009/2010 Supercab rear upper seat - F150online Forums
The best method I found was to stick my hand behind the seat and unclip the plastic mount with my finger, while pushing down a little on the top of the seat. I can probably get it out in under 30 seconds after having done it a couple of times.
I mounted my antenna mount on the tailgate, ran the cable along the edge and down under the bed. I also encased the cable with split loom for some additional protection.


The cable goes under the bed and into the frame rail, to keep it protected from gravel, etc.

I used a fish tape to route the cable though the frame rail. The cable exits at the forward most bed mount, and is routed through the cab vent behind the back seat. I didn’t take any pics of this, but you can look at Phyguy’s version:
http://www.fordraptorforum.com/f12/icom-id-880h-install-lots-pics-16688/#post266595
Next, I worked on the power side of it. The extension kit I bought came with a long power cable. I soldered some ring terminals on the ends (also added heat shrink) so that they could be directly connected to the battery. Then, I inserted the wires inside of split loom and routed it along the existing wiring harness as well as the harness for my light bar.
Excuse the bad pics, I took them at night.


I used the same grommet as All The Way to get through the firewall. Take a look here:
http://www.fordraptorforum.com/f12/yaesu-ft-8800r-install-12575/
Then I routed the wiring behind the passenger kick panel, under the sill plate and behind the trim panel behind the back seat. There is a pic of that later.
Now we will cover the wires for the head unit, mic and external speakers. After
With the main unit mounted behind the seat, the speaker would be pretty muffled. I bought a pair of relatively cheap external speakers (one for each channel). After some thinking over, I mounted them with zip ties to the front pedestals of the driver’s seat frame. I checked the path of the seat and it can move forward and back with plenty of clearance between it and the speakers. Here is a pic with the seat all of the way back:

Here are the wires for the head unit and mic. This is where the head unit wire enters the driver’s side of the console. The mic is plug into the extension connector, which is zip tied to the bottom of the seat track.

I removed the kick panels on each side of the center console. The head unit cable continues on inside of the console. The extension connector is attached to the heater duct with double sided tape (white connector behind the cable bundle). The remote head unit cable plug in here, with the excess bundled.

Next, I disassembled the center console as described by J here: http://www.fordraptorforum.com/f12/...r-radio-install-frs-gmrs-mod-7519/#post109730
I routed the cable up through the console to the switch panel based on the way that All The Way routed his aux speaker cable as described here:
http://www.fordraptorforum.com/f12/yaesu-ft-8800r-install-12575/#post194117
Here is what the cable looks like after install:


I bundled the head unit, mic and speaker connectors together, inserted them into split look and routed them along the bottom of the driver’s seat track (in between the seat track and the console) across the back floor board and under the back seat.

Now with the floor mat on top

I picked this location as it worked well with all of my other plans for cable routing, is in a low foot traffic location and with the mat installed is fairly protected.
Now for the main unit. I installed this after the antenna, but I wanted to discuss all of the cable routing, too, so I will cover it all here. I picked behind the seat for a couple of reasons. I park outside, so this is completely hidden. Also, I don’t have to worry about it being kicked or stepped on. After removing the back seat, I looked at several locations for mounting. I picked this location based on room for the unit for cooling. I marked the location and removed the rear sound insulation (it attaches with 5 christmas trees). I trimmed the insulation with shears to allow for plenty of room around the main unit. Then, I marked and drilled the rear cab wall for the mount. I used stainless bolts, washers and lock nuts. I also applied silicone under the head of the nut and on both sides of the washer, for exterior sealing. I had a buddy come help me install this part. Afterwards the insulation was reinstalled. Then, I hooked up the cables, coiled the excess and zip tied everything together.
Here it is, all installed:

The wires on the left: power, antenna and programming. The wires on the right are head unit, mic and aux speakers. The bulge just up and to the right of the main unit is the power sliding window motor.
One word of caution. Quite a bit of the mounts, etc back here are SHARP. They were stamped out without dressing the edges. I sliced up my fingers a couple of times without noticing it until I saw all of the blood.
Referring to the pic above, the programming cable enters some split loom and goes off to the left. I routed it around and zip tied to the rear seat mount for access with the rear seat in. As I usually have a kiddy seat in the back, this will make programming much easier.

It will stick out far enough for me to hook my usb cable up and then tuck back behind the seat belt when not in use.

This was a pretty time intensive install for me. I worked on it for most of one weekend (all day Sat and all of Sun afternoon) and an additional Sunday afternoon. I spent quite a bit of time thinking about where to route things, etc. Your mileage may vary...
I have a couple of things left to finish. I need to figure out a mic mount. I will likely do something similar to what All The Way did here: http://www.fordraptorforum.com/f12/yaesu-ft-8800r-install-12575/#post194117 I also need to figure out something for the head unit. With the mounting back for the remote head installed, it is too big to mount where it currently sits (ala BigJ style). I am think of getting one of those ProClip mounts like CineSLR has in his truck. Take a look here: http://www.fordraptorforum.com/f65/cinema-slrs-camera-vehicle-2505/index2.html#post43824 J also mentioned the one I will very likely use here: http://www.fordraptorforum.com/f10/interior-device-mounting-solutions-5493/
Last edited:


